This post may contain affiliate links. Please read our disclosure policy.
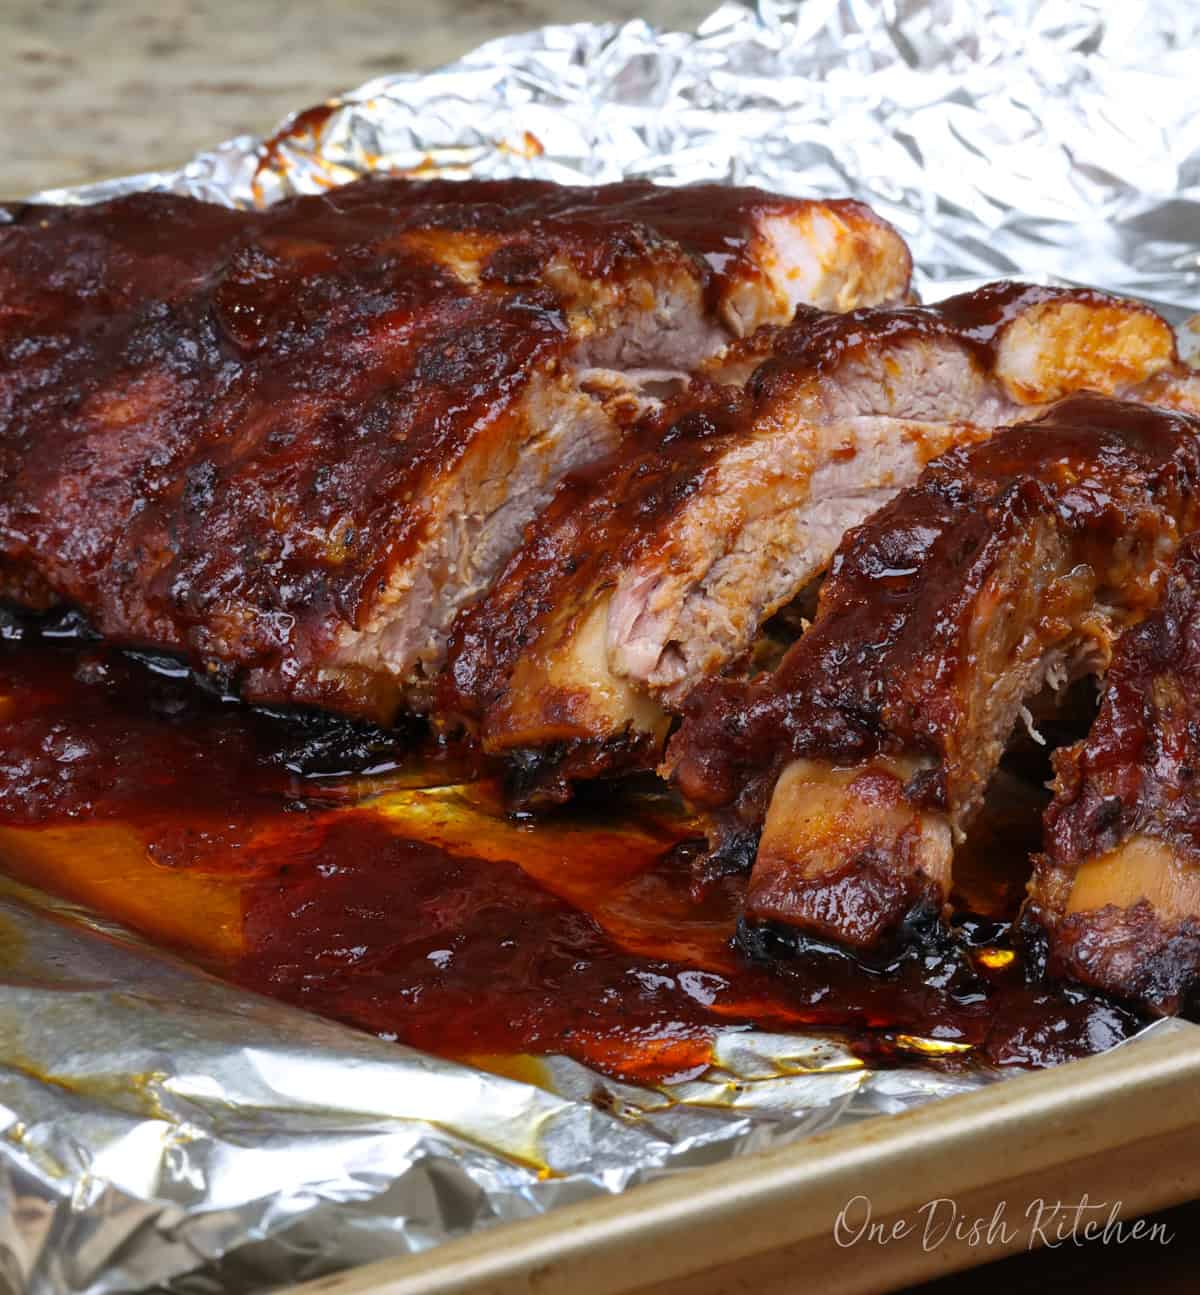
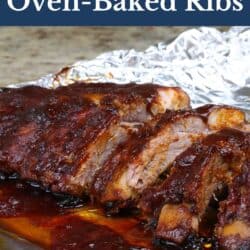
These oven baked baby back ribs are seasoned with a simple dry rub and baked low and slow until tender and juicy. Made with half a rack of ribs, this single serving recipe delivers fall off the bone ribs finished with barbecue sauce, all using an easy oven method.
Why You’ll Love This Recipe
- Oven Baked, No Grill Needed: These baby back ribs cook low and slow in the oven until tender and juicy.
- Simple Pantry Ingredients: The dry rub uses common spices you likely already have on hand.
- Perfectly Portioned: Made with ½ rack of ribs, about 6 to 7 ribs, ideal for one generous serving or to share.
- Easy to Scale: Double the ingredients to cook a full rack using the same method.
There’s something so satisfying about pulling a pan of ribs from the oven and seeing how tender they’ve become after a slow bake. The meat is juicy, the seasoning has settled into every bite, and the ribs slice cleanly from the bone. This is the recipe I reach for when I want oven baked ribs that deliver big flavor using simple ingredients and an easy, reliable method.
Looking to round out your meal? Oven baked baby back ribs pair well with classic single serving sides like baked beans for one, macaroni and cheese for one, small batch potato salad, buttery small batch mashed potatoes, or small batch cornbread. Finish the meal with a simple dessert like ambrosia for one.

Ingredients
If you have any ingredients leftover from this half rack oven baked ribs recipe, check out our Leftover Ingredients Recipe Finder.
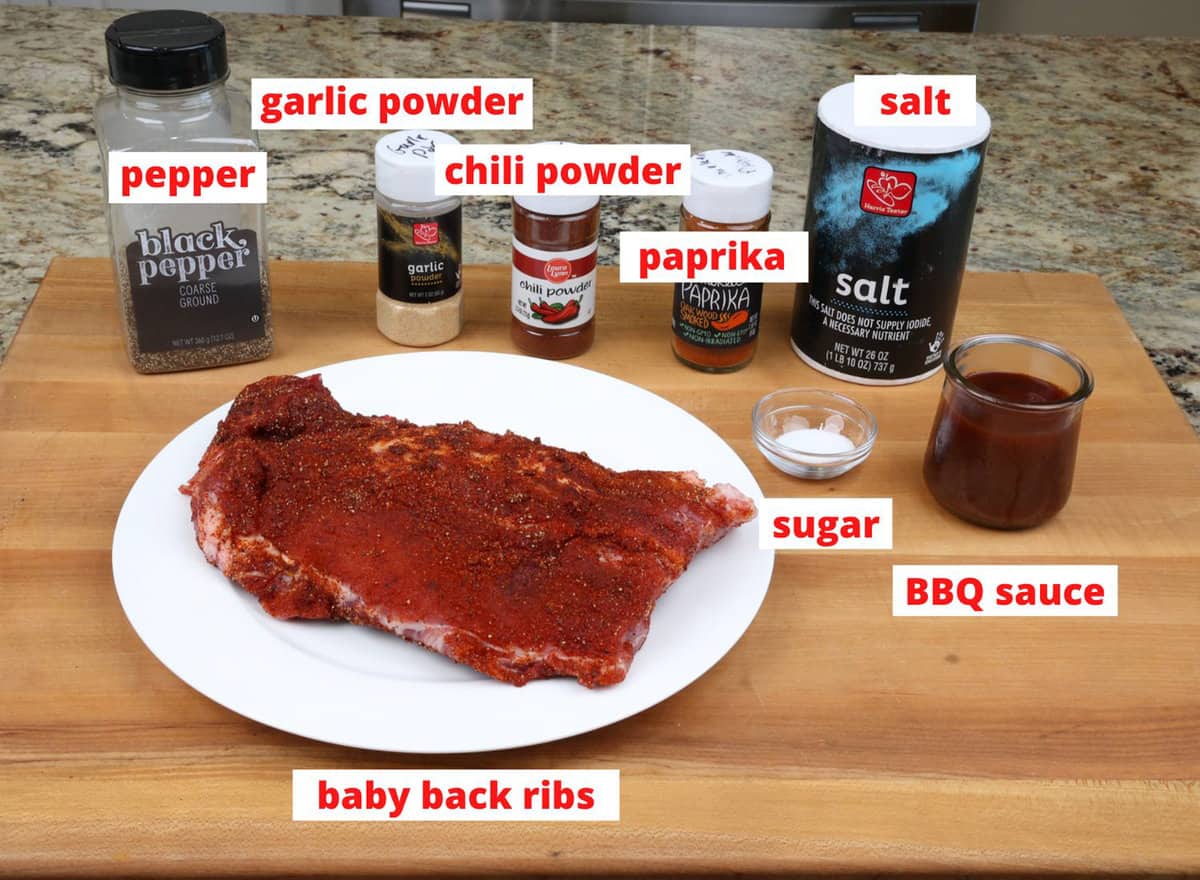
- Baby Back Ribs: Use ½ rack of baby back ribs, about 6 to 7 ribs. This is the right amount for one generous serving or to share between two. Many butchers will cut a full rack in half, or you can do it at home. Wrap and freeze the remaining half for up to 4 to 6 months.
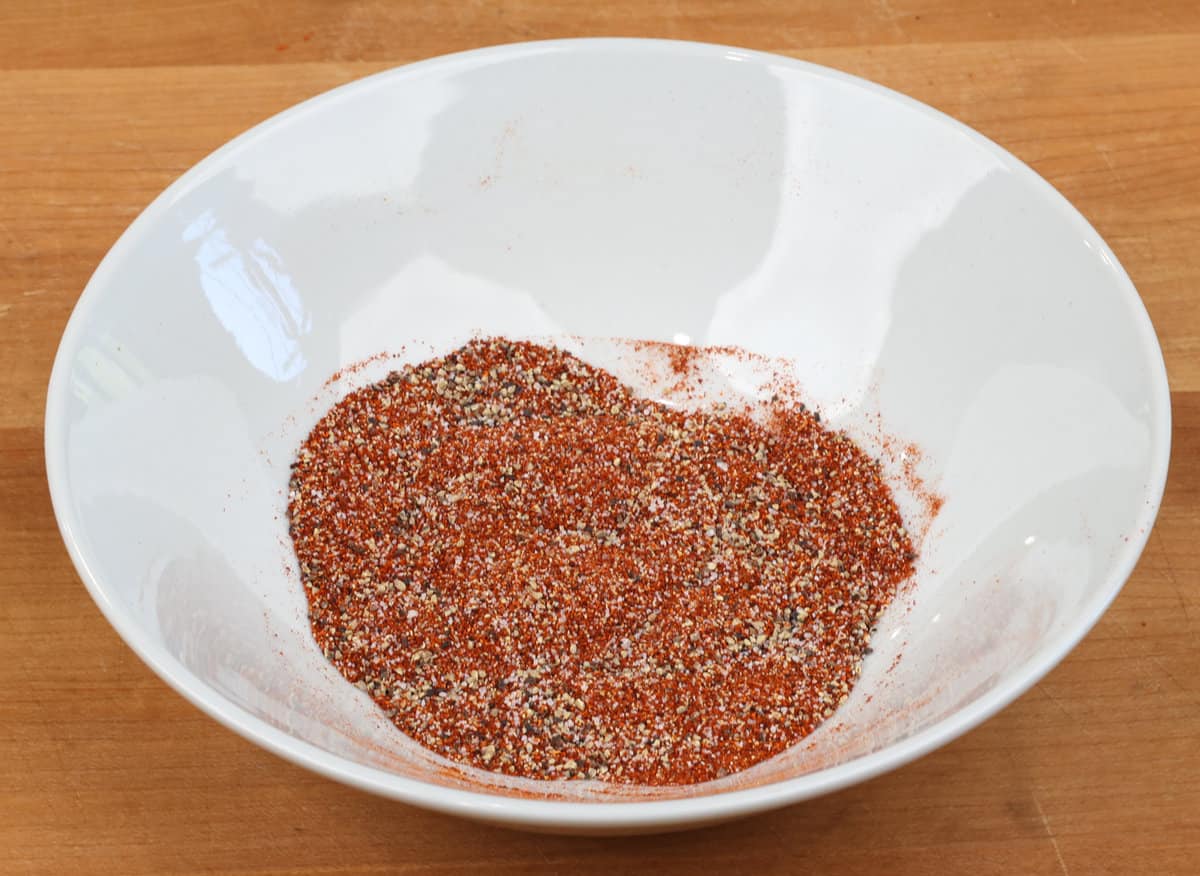
- Dry Rub: A simple blend of paprika, chili powder, salt, sugar, black pepper, and garlic powder seasons the ribs and builds flavor as they bake low and slow in the oven.
- BBQ Sauce: Use your favorite BBQ sauce or make a small batch of homemade BBQ sauce. Brushing it on near the end of baking creates a sticky, flavorful finish. If you prefer dry oven baked ribs, you can skip the sauce and serve it on the side.
What Are Baby Back Ribs?
Baby back ribs come from the upper ribcage near the backbone. They are smaller, leaner, and more tender than spare ribs, which makes them a great choice for oven baked ribs cooked low and slow.
How To Make Oven-Baked Ribs
The photos walk you through each step of making oven baked ribs for one. For exact ingredient amounts, scroll to the recipe card below.
- Make the Dry Rub: Mix the paprika, chili powder, salt, sugar, black pepper, and garlic powder in a small bowl or jar. Set aside.
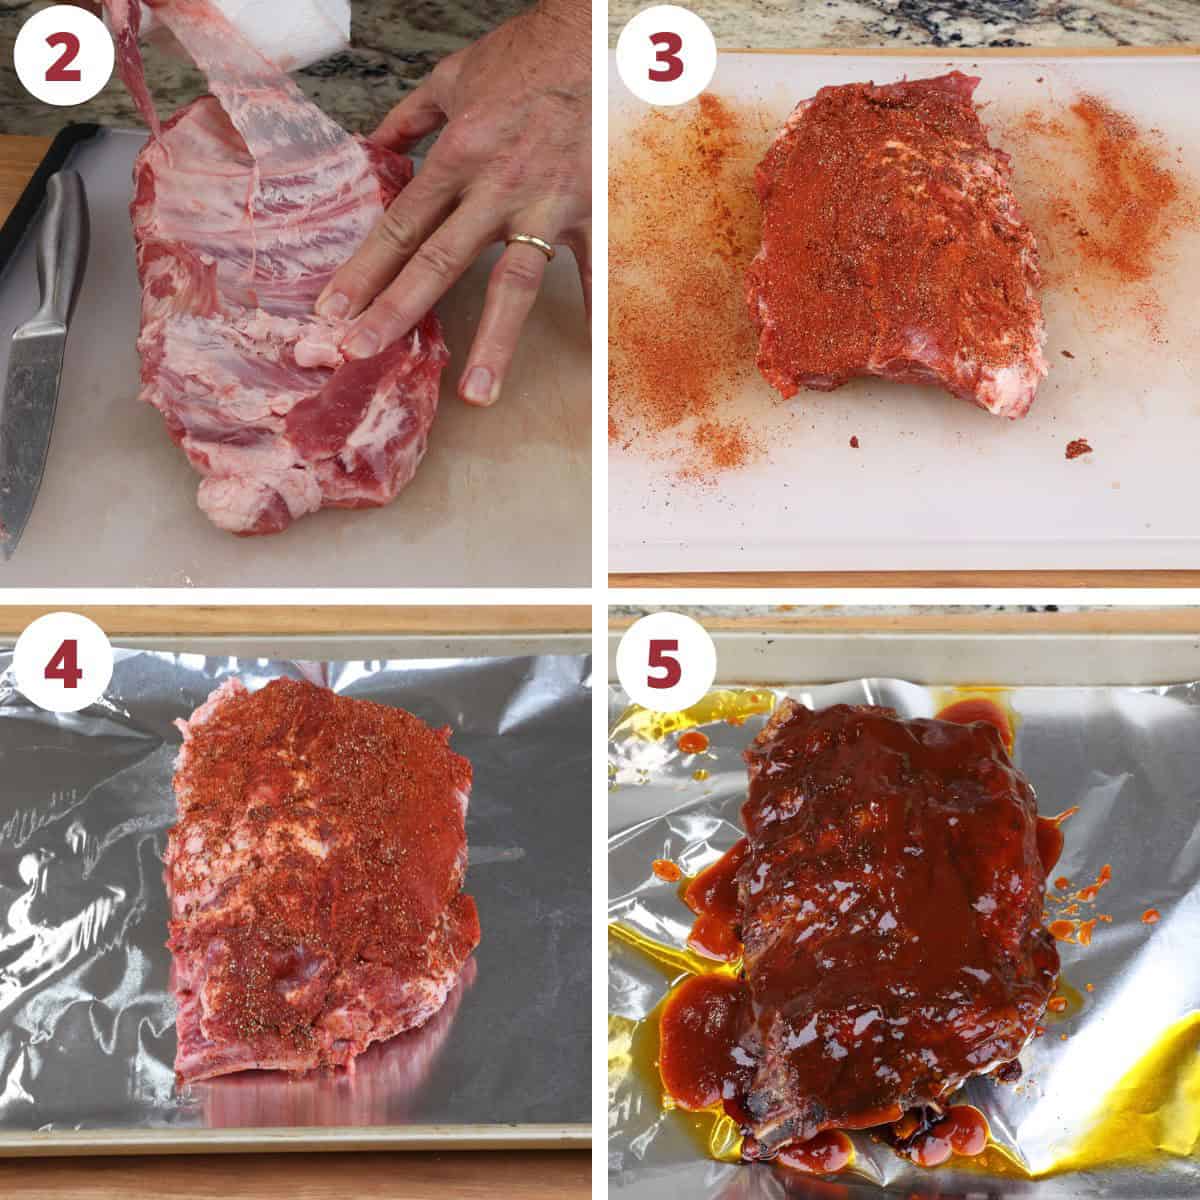
- Prepare the Ribs: Heat the oven to 225°F (107°C). Place the ribs bone side up on a cutting board. Slide a knife under the thin membrane on the back of the ribs, then pull it away using your fingers or a kitchen towel.
Tip: The membrane can turn tough as ribs bake. Removing it helps the ribs become more tender, but this step is optional.
- Trim, Flip, and Season: Turn the ribs meat side up and trim away any excess fat if needed. Generously season both sides with the dry rub, pressing it into the meat.
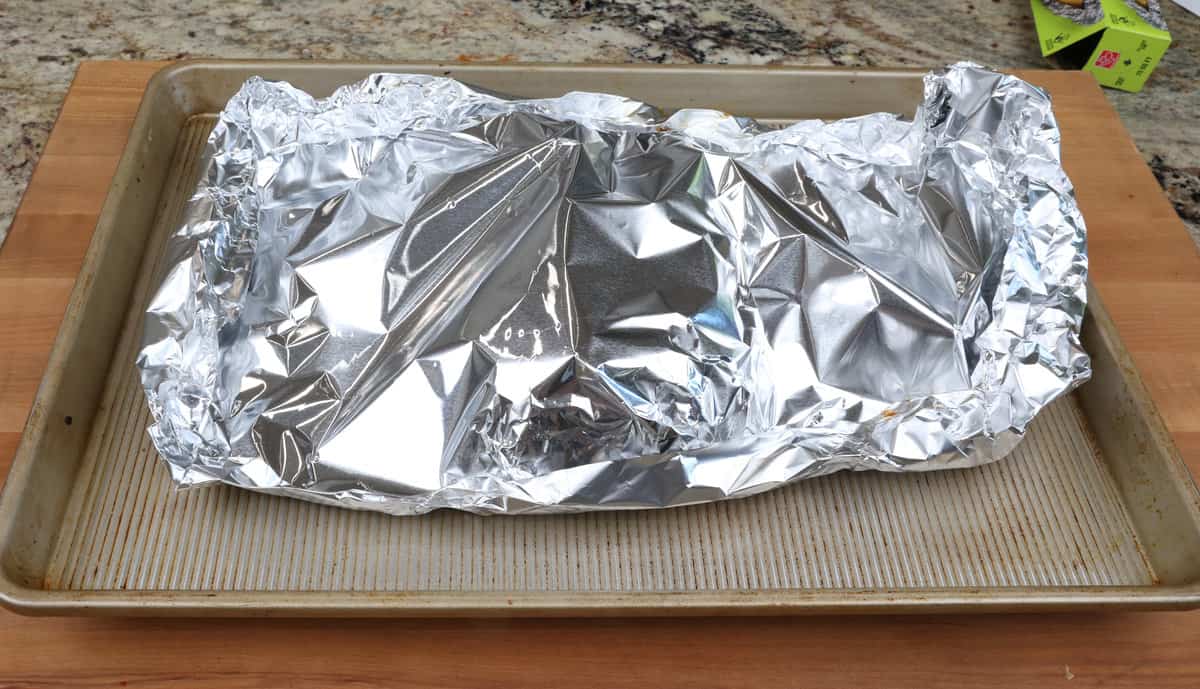
- Bake Low and Slow: Line a rimmed baking sheet with foil. Place the ribs in the center, meat side up. Bake uncovered for 3½ hours.
- Add Sauce: Remove the ribs from the oven and brush both sides generously with barbecue sauce.
Tip: If you prefer dry ribs, skip the sauce and continue with the next step.
- Seal, Bake, and Check for Doneness: Fold the foil tightly around the ribs to form a sealed packet. Return them to the oven and bake for 1 hour longer, until the internal temperature reaches 198 to 202°F when measured in the thickest part of the meat, between the bones.
- Rest: Remove from the oven and let the ribs rest, covered, for 10 minutes.
- Slice and Serve: Cut between the bones with a sharp knife.
Optional: For a less saucy finish, broil the ribs for 3 to 4 minutes until the sauce begins to caramelize. Watch closely to prevent burning.

Tips For Perfect Oven-Baked Ribs
- Start with Meaty Baby Back Ribs: Choose ribs with plenty of meat on the bones and light marbling. This helps keep oven baked ribs tender during the long, slow bake.
- Remove the Membrane: The thin membrane on the back of the ribs can turn tough in the oven. Removing it allows the dry rub to season the meat more evenly and improves texture.
- Bake Low and Slow: Cooking ribs at a low temperature for several hours is key to achieving tender, fall-apart oven baked ribs.
- Check Internal Temperature: Baby back ribs are done when they reach 198 to 202°F. Insert an instant-read thermometer into the thickest part of the meat, between the bones, and check more than one spot for accuracy.
Frequently Asked Questions
Baby back ribs are done when they reach an internal temperature of 198 to 202°F, measured in the thickest part of the meat between the bones.
At 225°F, baby back ribs take about 4½ hours total. This includes 3½ hours uncovered, followed by 1 hour wrapped in foil.
Yes. Simply double the ingredients and bake a full rack using the same temperature and timing.
Store leftover ribs in an airtight container in the refrigerator for up to 3 to 4 days.
Yes. Wrap the ribs tightly or store them in a freezer safe container and freeze for up to 3 months. Label and date before freezing.
Place the ribs on a baking sheet, cover with foil, and reheat in a 250°F oven for 15 to 20 minutes, or until warmed through. Brush with extra barbecue sauce if desired.
Ways To Use Leftover Ingredients
If you have any ingredients leftover from this recipe, check out our Leftover Ingredients Recipe Finder or you might like to consider using them in any of these single serving and small batch recipes:

If you’ve tried this single serving oven baked ribs recipe or any recipe on One Dish Kitchen please let me know how you liked it by rating the recipe and telling me about it in the comment section below.
Also, if you take a picture please tag us on Instagram (@onedishkitchen) we’d love to see it!
Oven Baked Ribs For One

Equipment
Ingredients
- 2 teaspoons paprika
- ½ teaspoon chili powder
- ½ teaspoon salt
- ½ teaspoon sugar
- ½ teaspoon coarsely ground black pepper
- ½ teaspoon garlic powder
- ½ rack baby back ribs (6 to 7 ribs)
- ¾ cup barbecue sauce (optional) Consider using our homemade small batch BBQ sauce recipe.
Instructions
- Make the Dry Rub: Mix the paprika, chili powder, salt, sugar, black pepper, and garlic powder in a small bowl or jar. Set aside.
- Heat the oven to 225°F (107°C).
- Place the ribs bone side up on a cutting board. Slide a knife under the thin membrane on the back of the ribs, then pull it away using your fingers or a kitchen towel.Tip: The membrane can turn tough as ribs bake. Removing it helps the ribs become more tender, but this step is optional.
- Turn the ribs meat side up. Trim away any excess fat if needed.
- Generously coat both sides of the ribs with the dry rub, pressing it into the meat.
- Line a rimmed baking sheet with foil. Place the ribs in the center, meat side up. Bake uncovered for 3½ hours.
- Remove the ribs from the oven and brush both sides generously with barbecue sauce.Tip: If you prefer dry ribs, skip the sauce and continue with the next step.
- Place a second sheet of foil over the ribs. Fold the top and bottom foil together around the edges to seal the ribs into a packet.
- Return the sealed ribs to the oven and bake for 1 hour longer, until the internal temperature reaches 198 to 202°F when measured in the thickest part of the meat.
- Remove the ribs from the oven and let them rest, still wrapped in foil, for 10 minutes.
- Uncover the ribs a cut between the bones with a sharp knife.Optional: For a less saucy finish, place the ribs under the broiler for 3 to 4 minutes, just until the sauce begins to caramelize. Watch closely so it doesn’t burn.
Notes
- Start with Meaty Baby Back Ribs: Choose ribs with plenty of meat on the bones and light marbling. This helps keep oven baked ribs tender during the long, slow bake.
- Remove the Membrane: The thin membrane on the back of the ribs can turn tough in the oven. Removing it allows the dry rub to season the meat more evenly and improves texture.
- Bake Low and Slow: Cooking ribs at a low temperature for several hours is key to achieving tender, fall-apart oven baked ribs.
- Check Internal Temperature: Baby back ribs are done when they reach 198 to 202°F. Insert an instant-read thermometer into the thickest part of the meat, between the bones, and check more than one spot for accuracy.
Nutrition
The information shown is an estimate provided by an online nutrition calculator. It should not be considered a substitute for a professional nutritionist’s advice.


The cooking temperature was not tight. My ribs were tough and underdone. I suggest doing everything the same, but cook at 300.
The barbecue sauce though, is among!
Thank you for your comment and for giving the recipe a try. The ribs are baked low and slow at 225°F, and the recipe has been tested many times with great results. That said, oven temperatures can vary quite a bit, so it’s possible yours may run a little cooler. I recommend checking for doneness with a meat thermometer to be sure, sometimes a few extra minutes in the oven makes all the difference. I’m so glad to hear you loved the barbecue sauce!
Every once in awhile I like too have country style ribs rather than baby back ribs. Would this recipe work for country style ribs?
Should work just fine.