This post may contain affiliate links. Please read our disclosure policy.
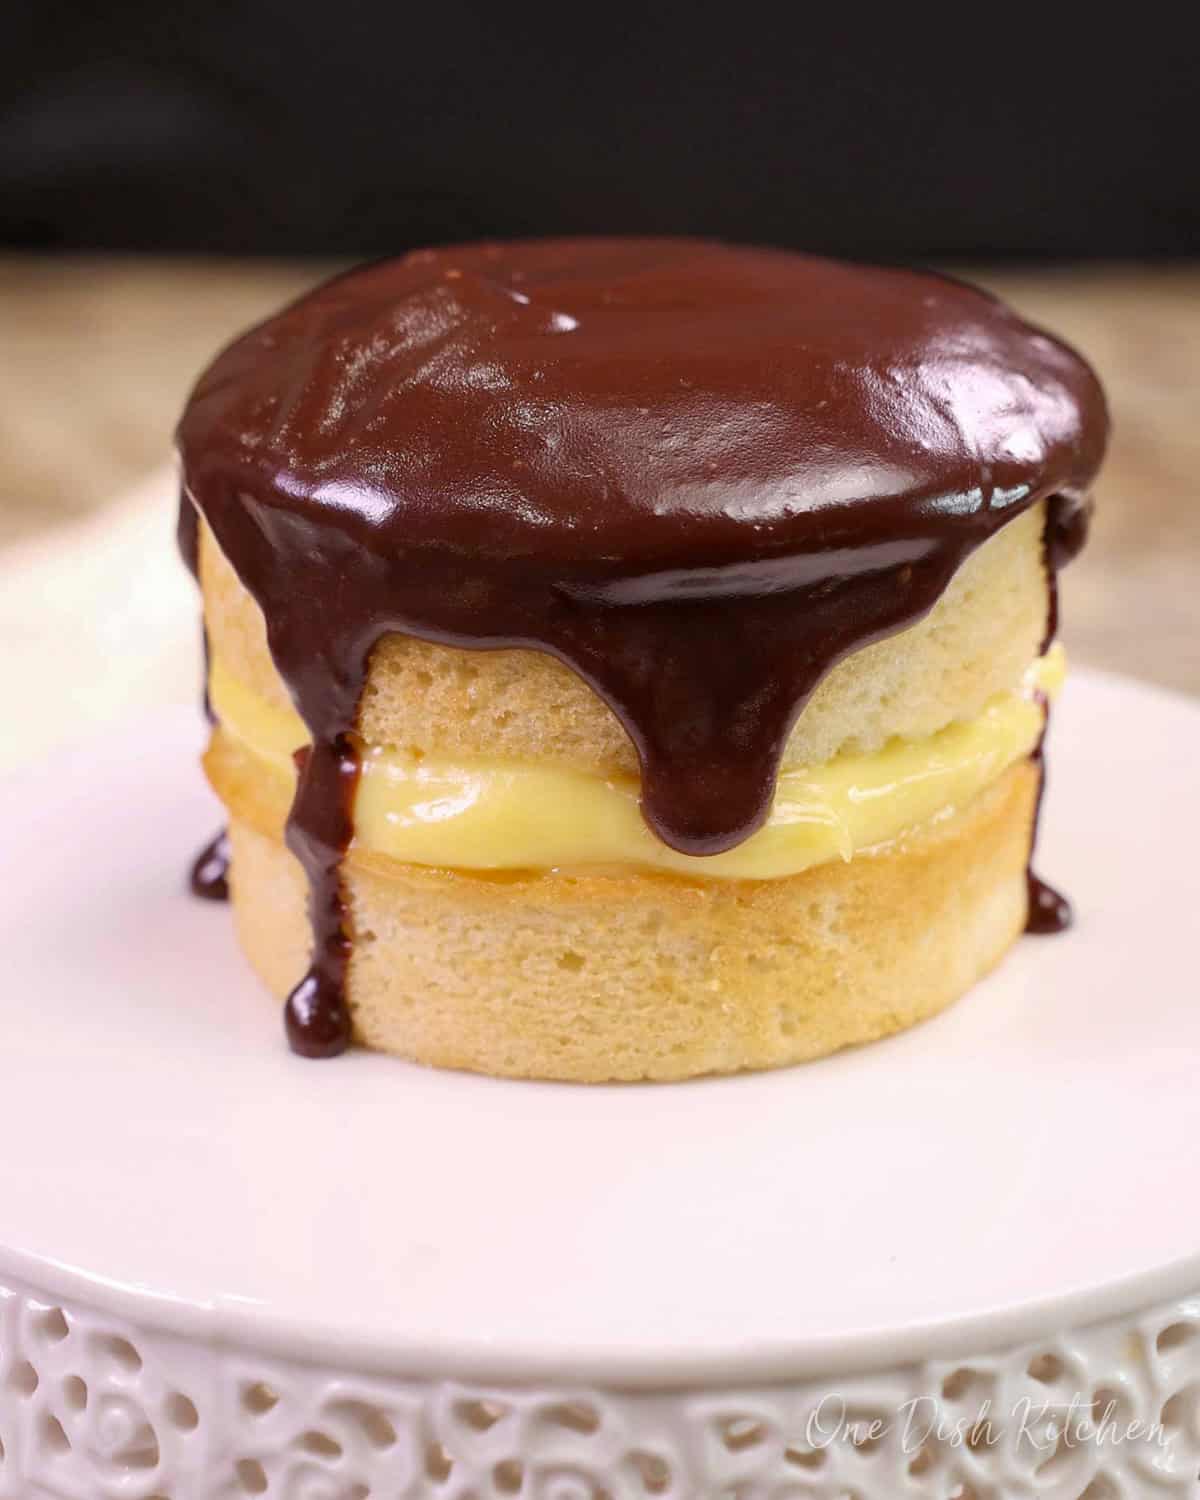
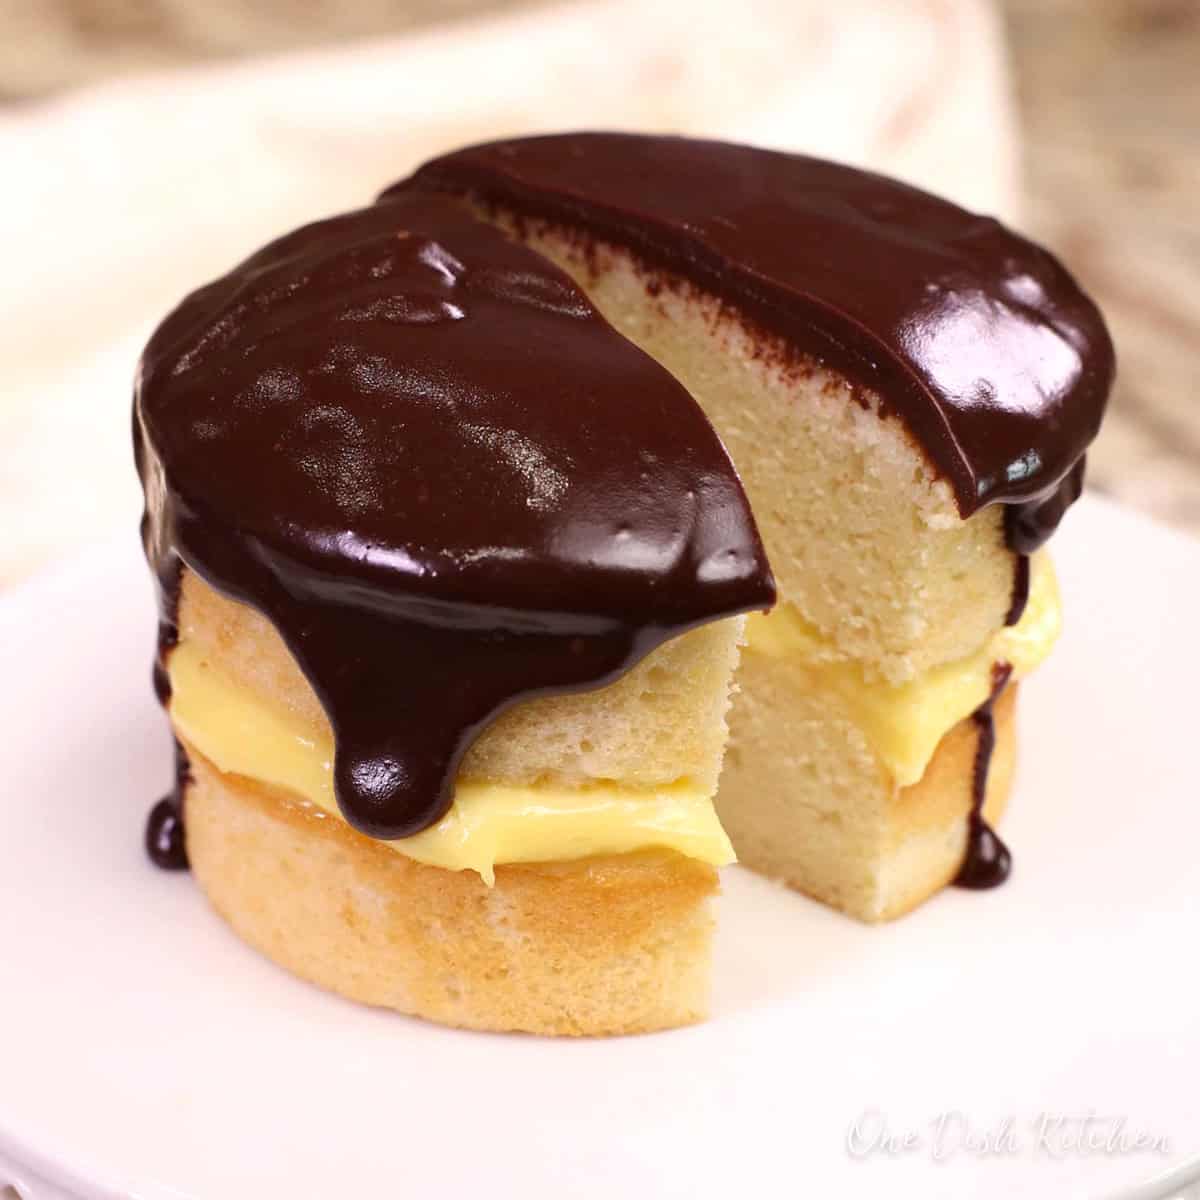
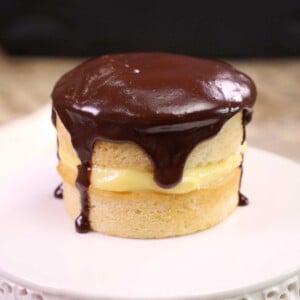
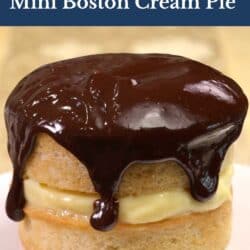
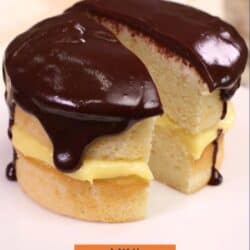
This Mini Boston Cream Pie has everything you love about the classic dessert: soft sponge cake, smooth vanilla pastry cream, and rich chocolate ganache, all in a perfectly portioned size. It’s easy to make and great for when you want a special treat without baking a full cake.
Featured Comment
“This made a lovely birthday cake for my husband and me. Excellent step by step instructions, the resulting cake was tender and delicious.”
– Jean
Why You’ll Love This Recipe
- Perfect Portion: Just the right size for one or two people.
- Simple to Make: Easy step-by-step instructions for each layer.
- Delicious Flavor: Soft cake, creamy filling, and rich ganache in every bite.
- Special but Simple: Looks impressive and comes together easily.
Boston Cream Pie is actually a cake, not a pie. Back in the 1800s, cakes and pies were often baked in the same pie plates, which is how this classic dessert got its name. It was first served at the Parker House Hotel in Boston and has been loved ever since.
I took everything that makes it special: soft sponge cake, smooth vanilla pastry cream, and rich chocolate ganache, and scaled it down to the perfect size for one or two people. It’s a fun and delicious way to enjoy a true classic without the fuss of a full-sized cake.
Try more of our small cake recipes, perfectly sized for one or two! Make a rich single serving Italian cream cake, small pineapple upside down cake, small flourless chocolate cake, tres leches cake for one, or our mini red velvet cake recipe.

Ingredients
If you have any ingredients leftover from this small Boston Cream Pie recipe, check out our Leftover Ingredients Recipe Finder.
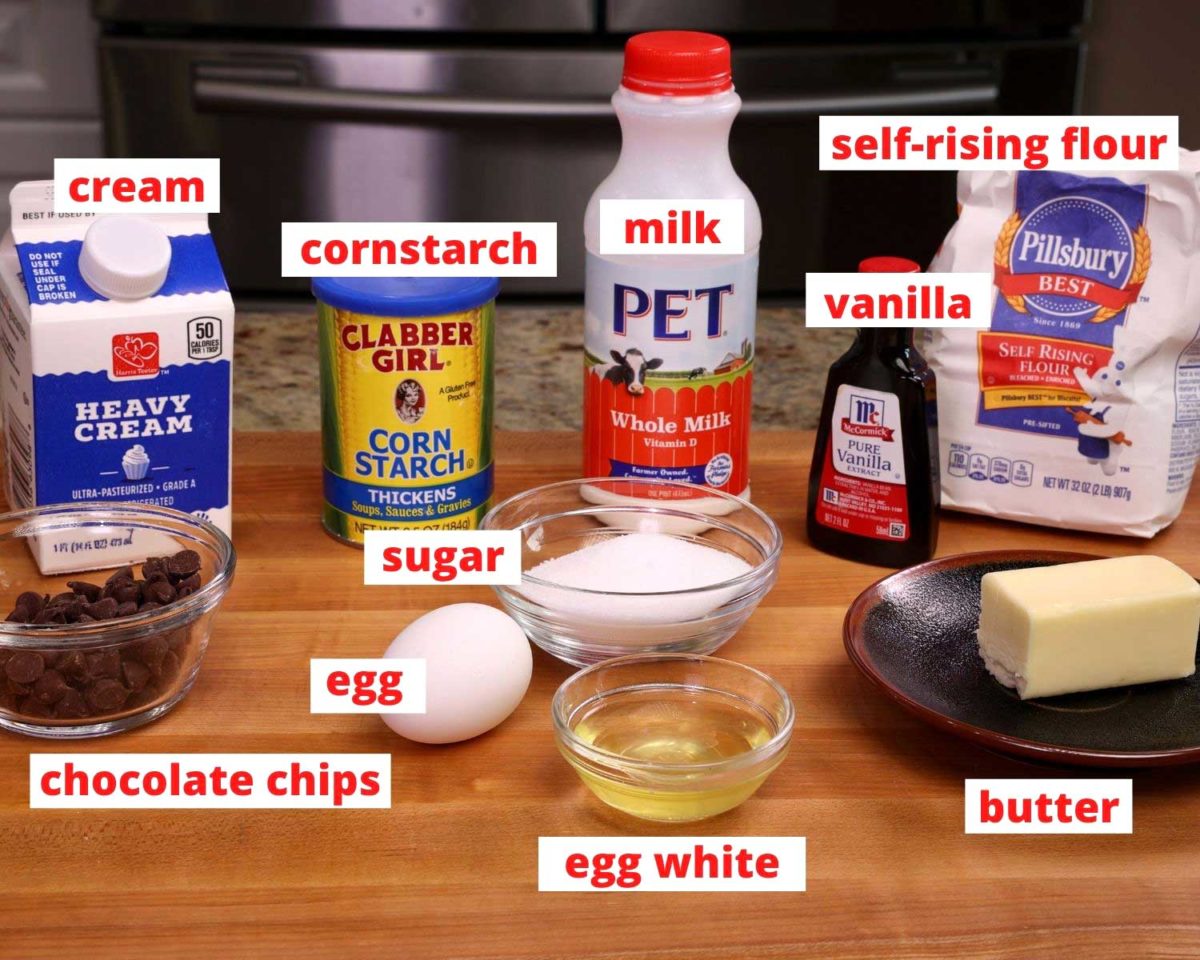
- Egg Yolk and Egg Whites: Use one egg yolk for the pastry cream and save the white for the cake. You’ll also need one additional egg white. If you’re wondering what to do with the leftover yolk, use it in our mini german chocolate cake, small batch oatmeal chocolate chip cookies, or one banana bread recipe.
- Salted Butter: Adds richness to the pastry cream and cake. Use a little extra to grease the ramekins.
- Heavy Cream: Helps create a soft, sponge-like cake and gives the ganache its smooth texture. If you have extra cream, use it in our mini French silk pie or in our small batch apple scone recipe.
- Self-Rising Flour: This type of flour already contains baking powder and salt. If you don’t have it, make your own by mixing 1 cup of all-purpose flour with 1½ teaspoons of baking powder and ¼ teaspoon of salt. You’ll only need ½ cup for this recipe. Store any extra in an airtight container and use it in our small white cake recipe or our two chocolate cupcakes.
- Semi-Sweet Chocolate Chips: Used for the ganache. You can also use milk or dark chocolate. Leftover chips? Use them in our single serve chocolate chip cookie or small batch chocolate pudding recipes.
See recipe card below for a full list of ingredients and measurements.
Recipe Variations
This mini Boston Cream Pie can be customized in a few simple ways:
- Citrus Cake: Add ½ teaspoon of lemon or orange zest to the batter.
- Berry Cream: Fold in a few mashed raspberries or strawberries into the pastry cream and top with a berry compote.
- Nutty Topping: Sprinkle chopped toasted pecans or hazelnuts over the ganache.
- Spiced Cake: Stir a pinch of cinnamon or nutmeg into the batter.
How To Make A Boston Cream Pie
These step-by-step photos and instructions are here to help you visualize how to make a mini Boston Cream Pie. See the recipe card below for ingredient amounts and full recipe instructions.
How to Make Pastry Cream
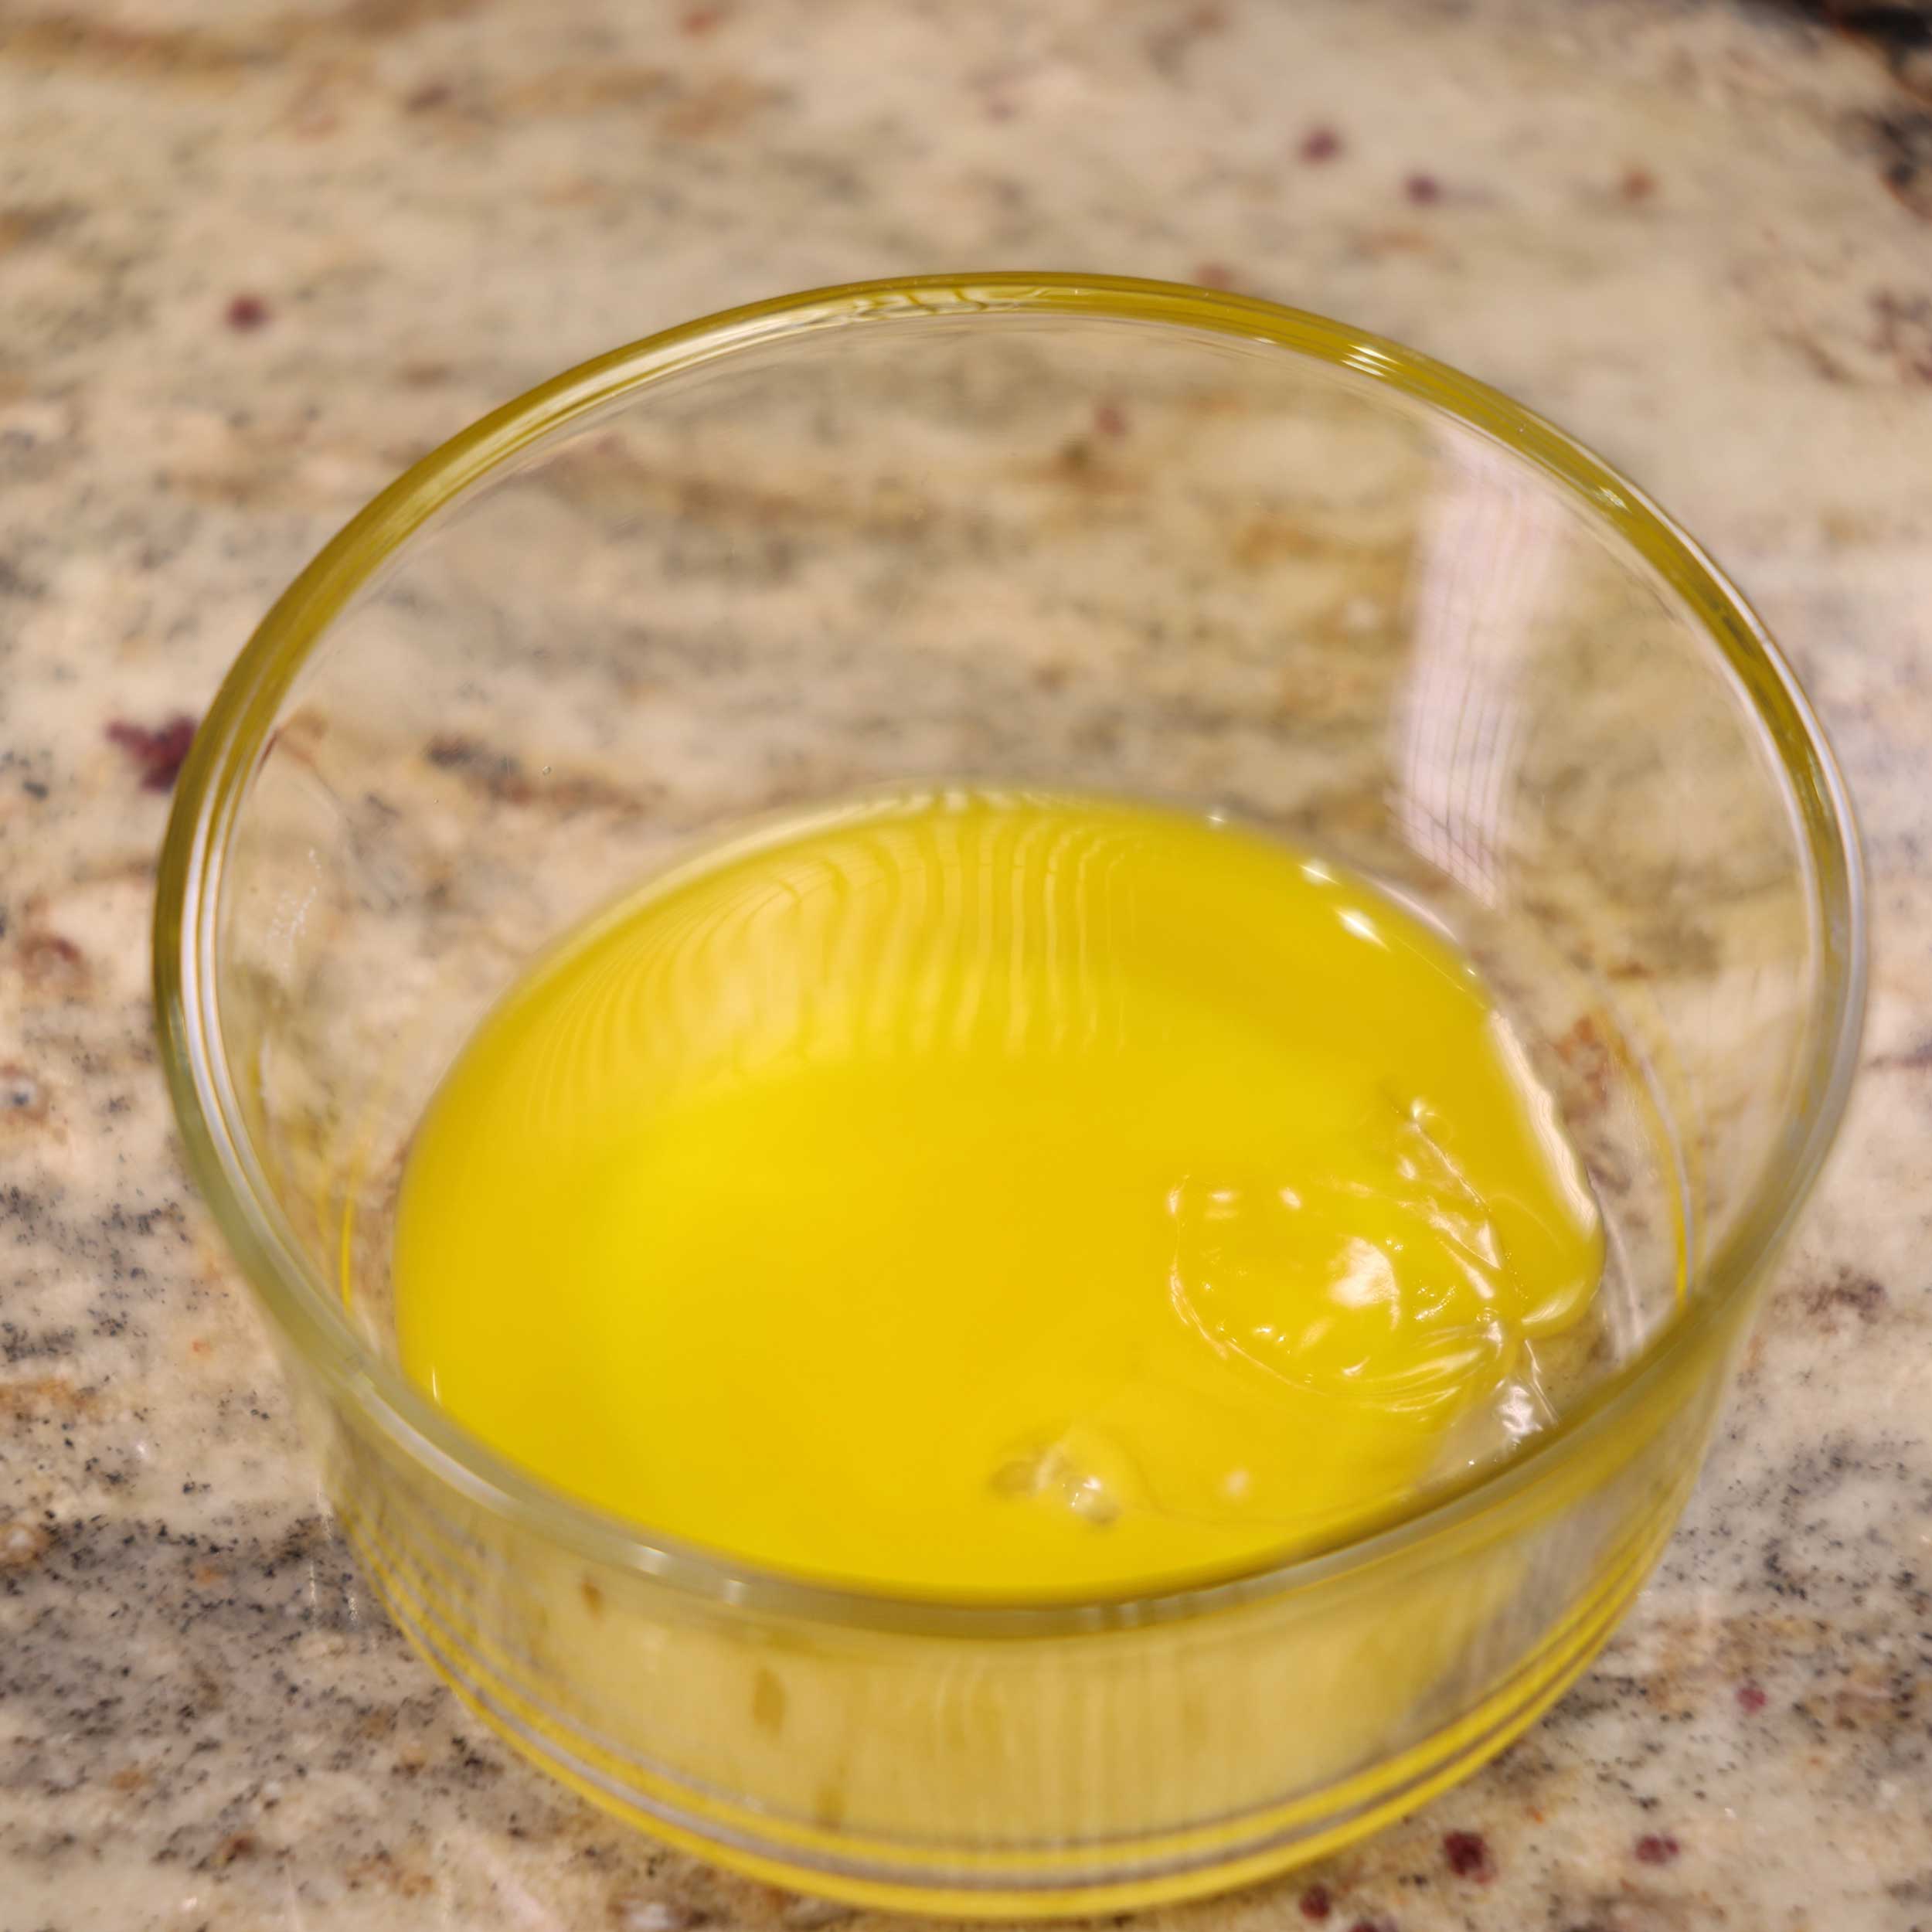
- Whisk the Egg Yolk: In a small bowl, whisk the egg yolk and set aside.
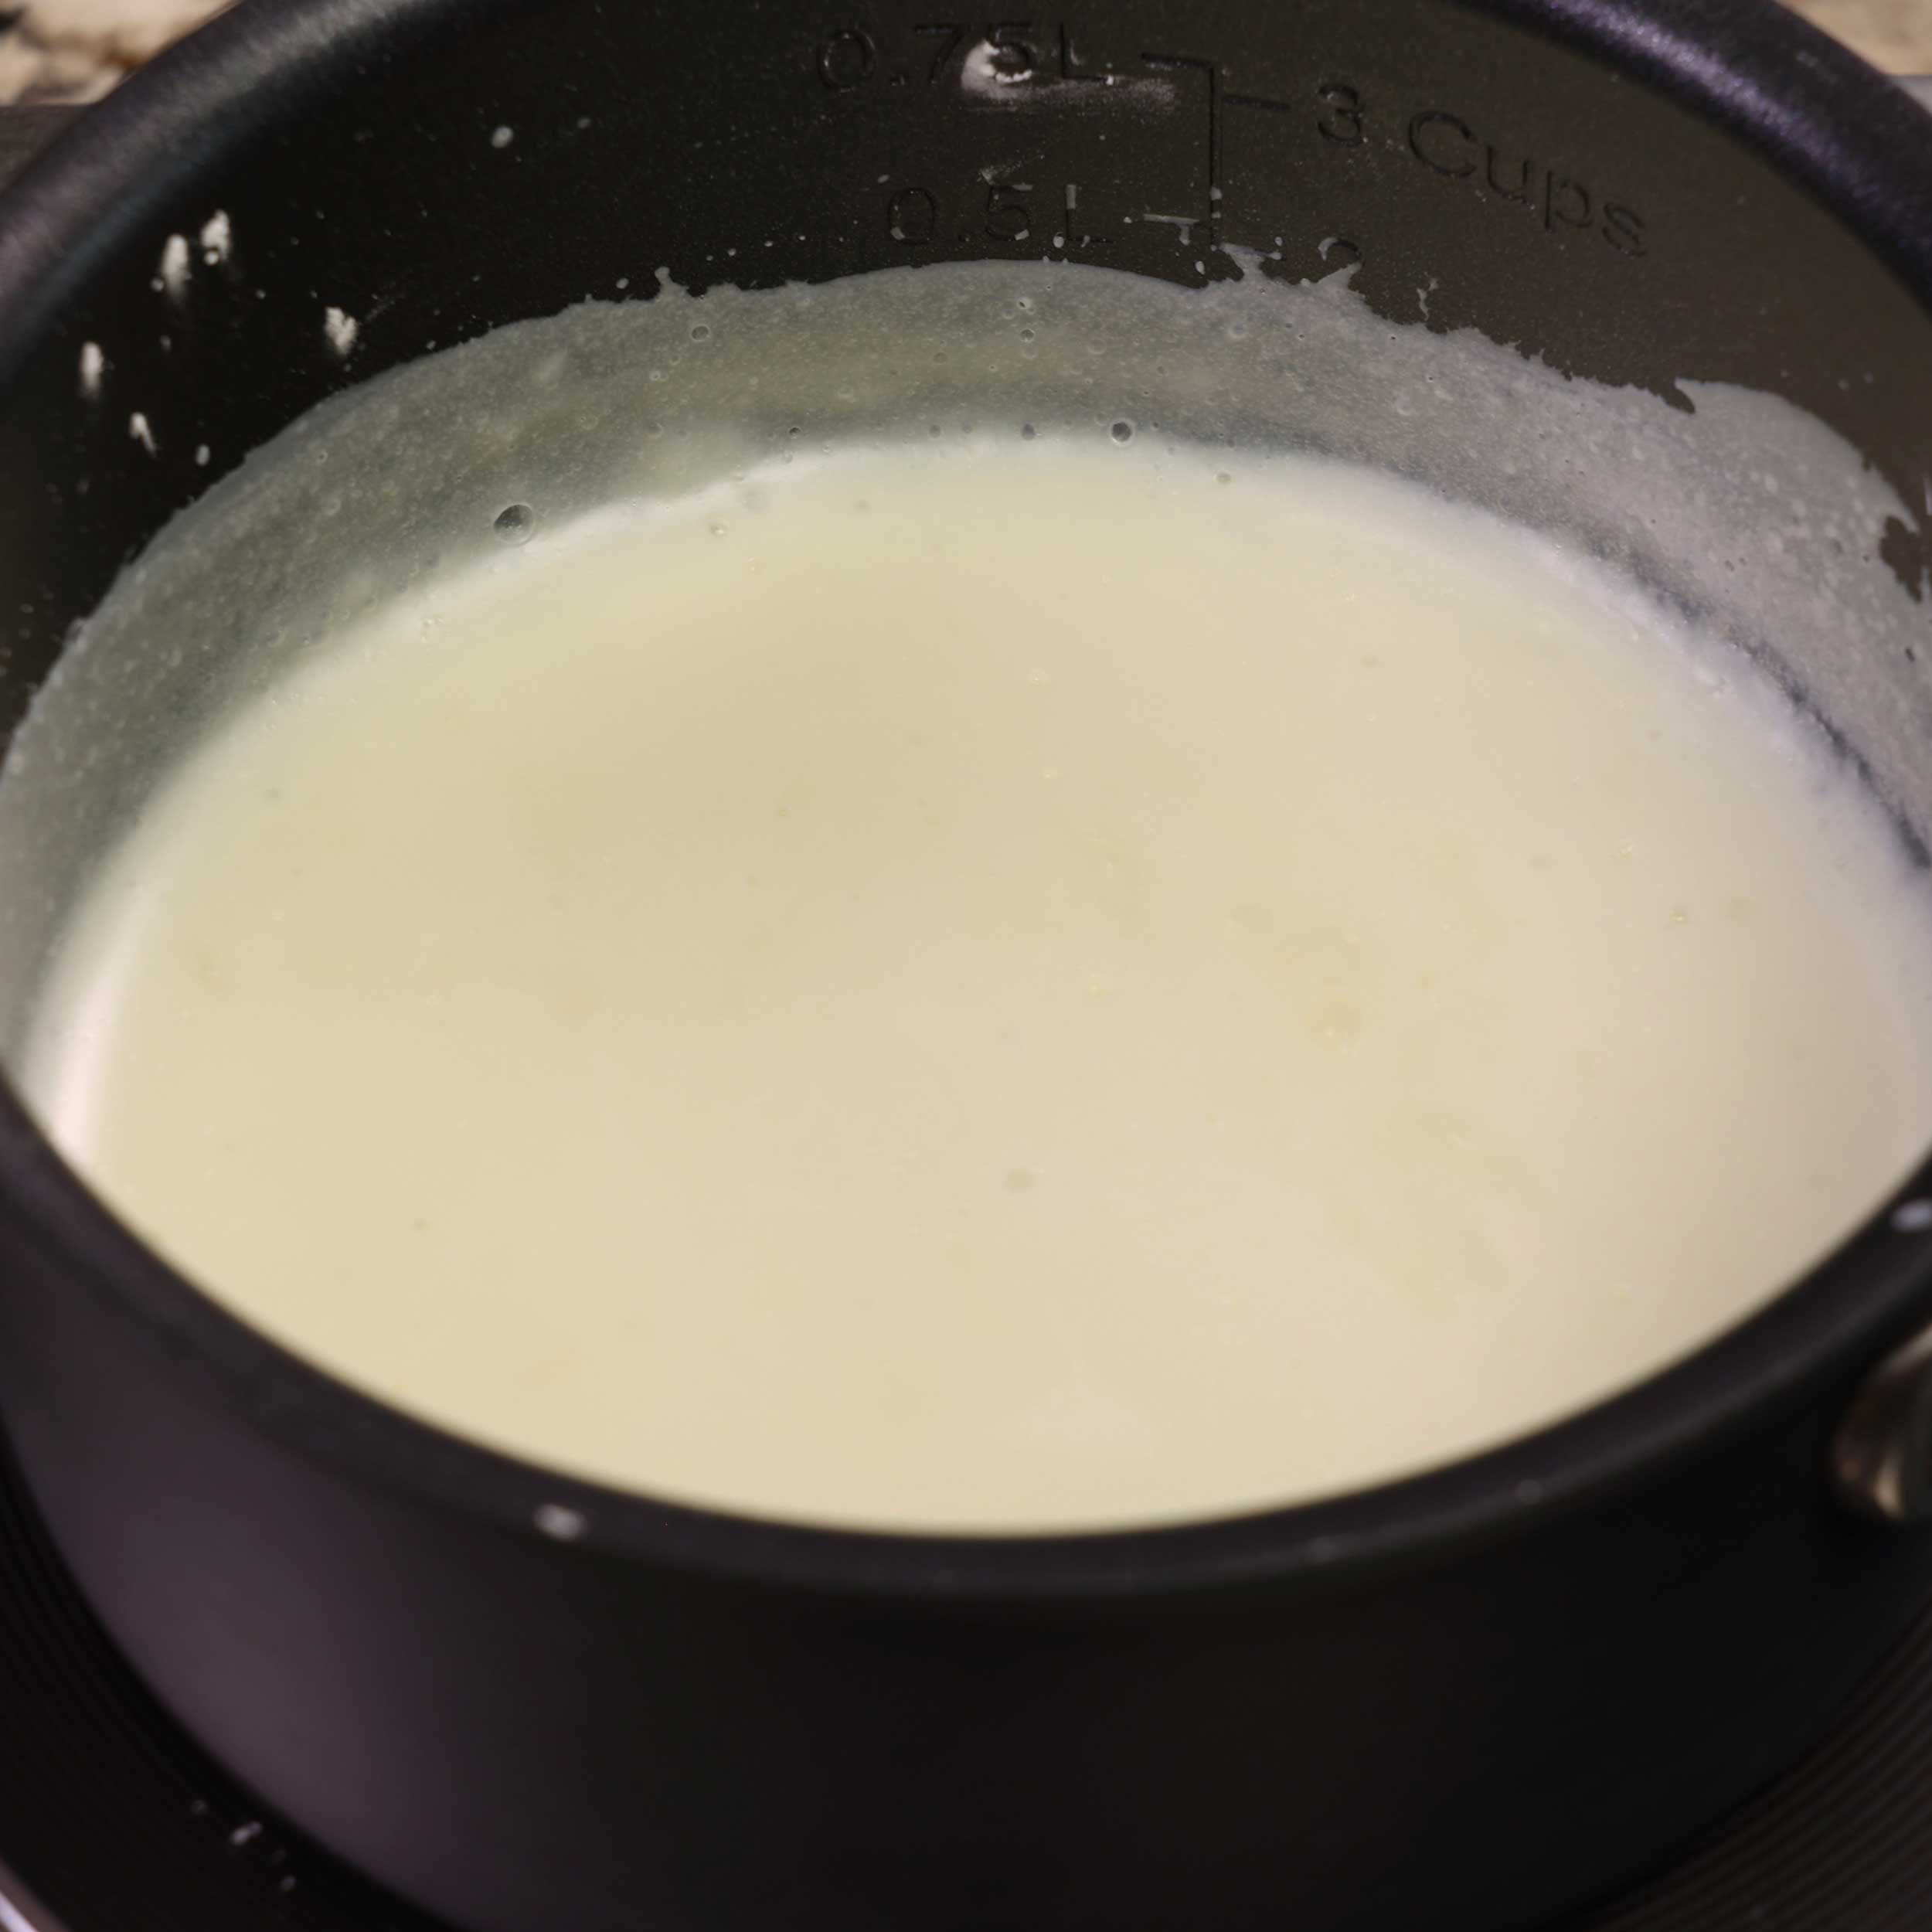
- Heat the Mixture: In a 1-quart saucepan, whisk together sugar, cornstarch, and milk until smooth. Place over medium heat, whisking constantly until the mixture thickens and starts to bubble. Cook for 1 more minute.
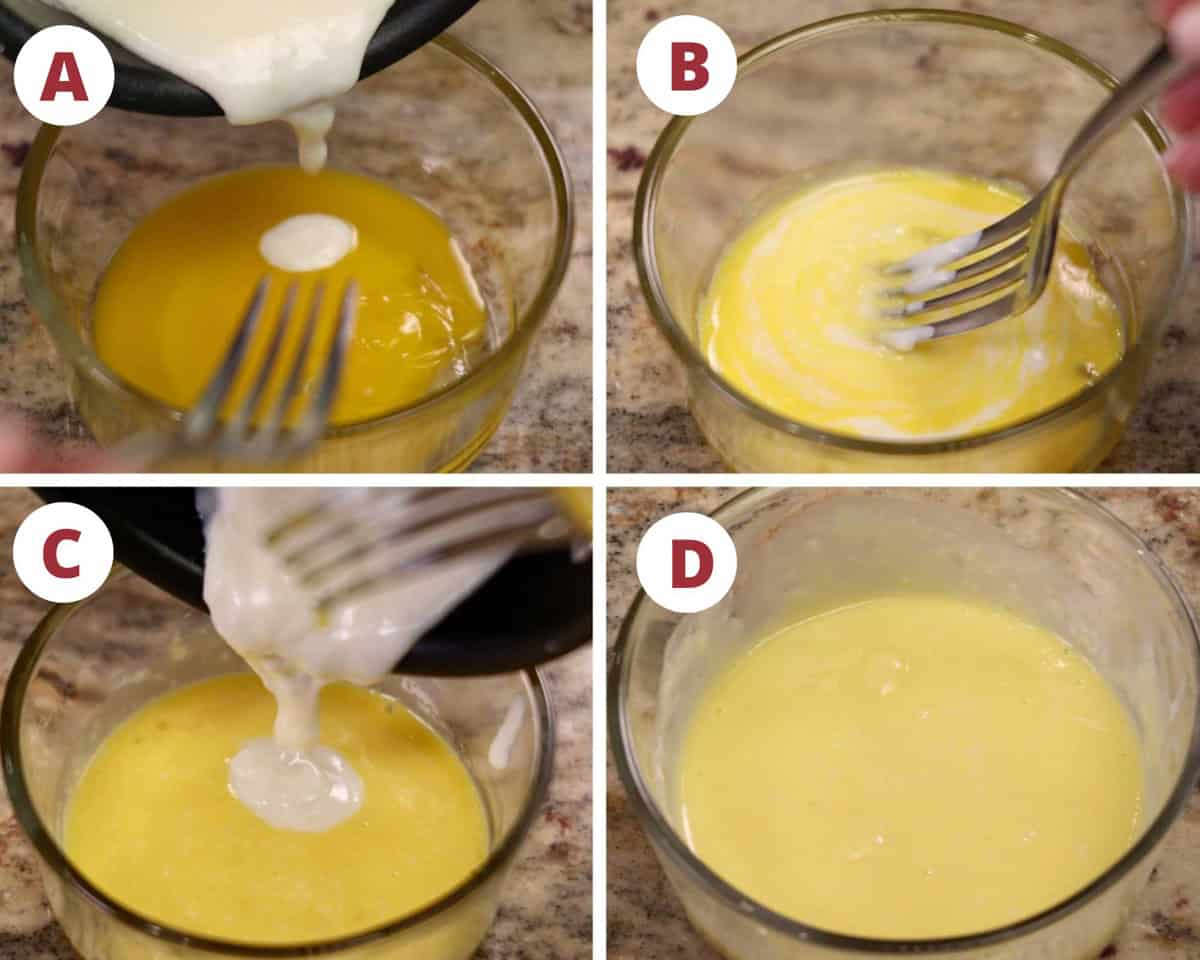
- Temper the Egg Yolk: Slowly add 1 teaspoon of the hot milk mixture to the egg yolk, whisking constantly. Continue adding small amounts, one teaspoon at a time, until fully combined. This step gently warms the egg without scrambling it. See steps A–D in the photo grid for reference.
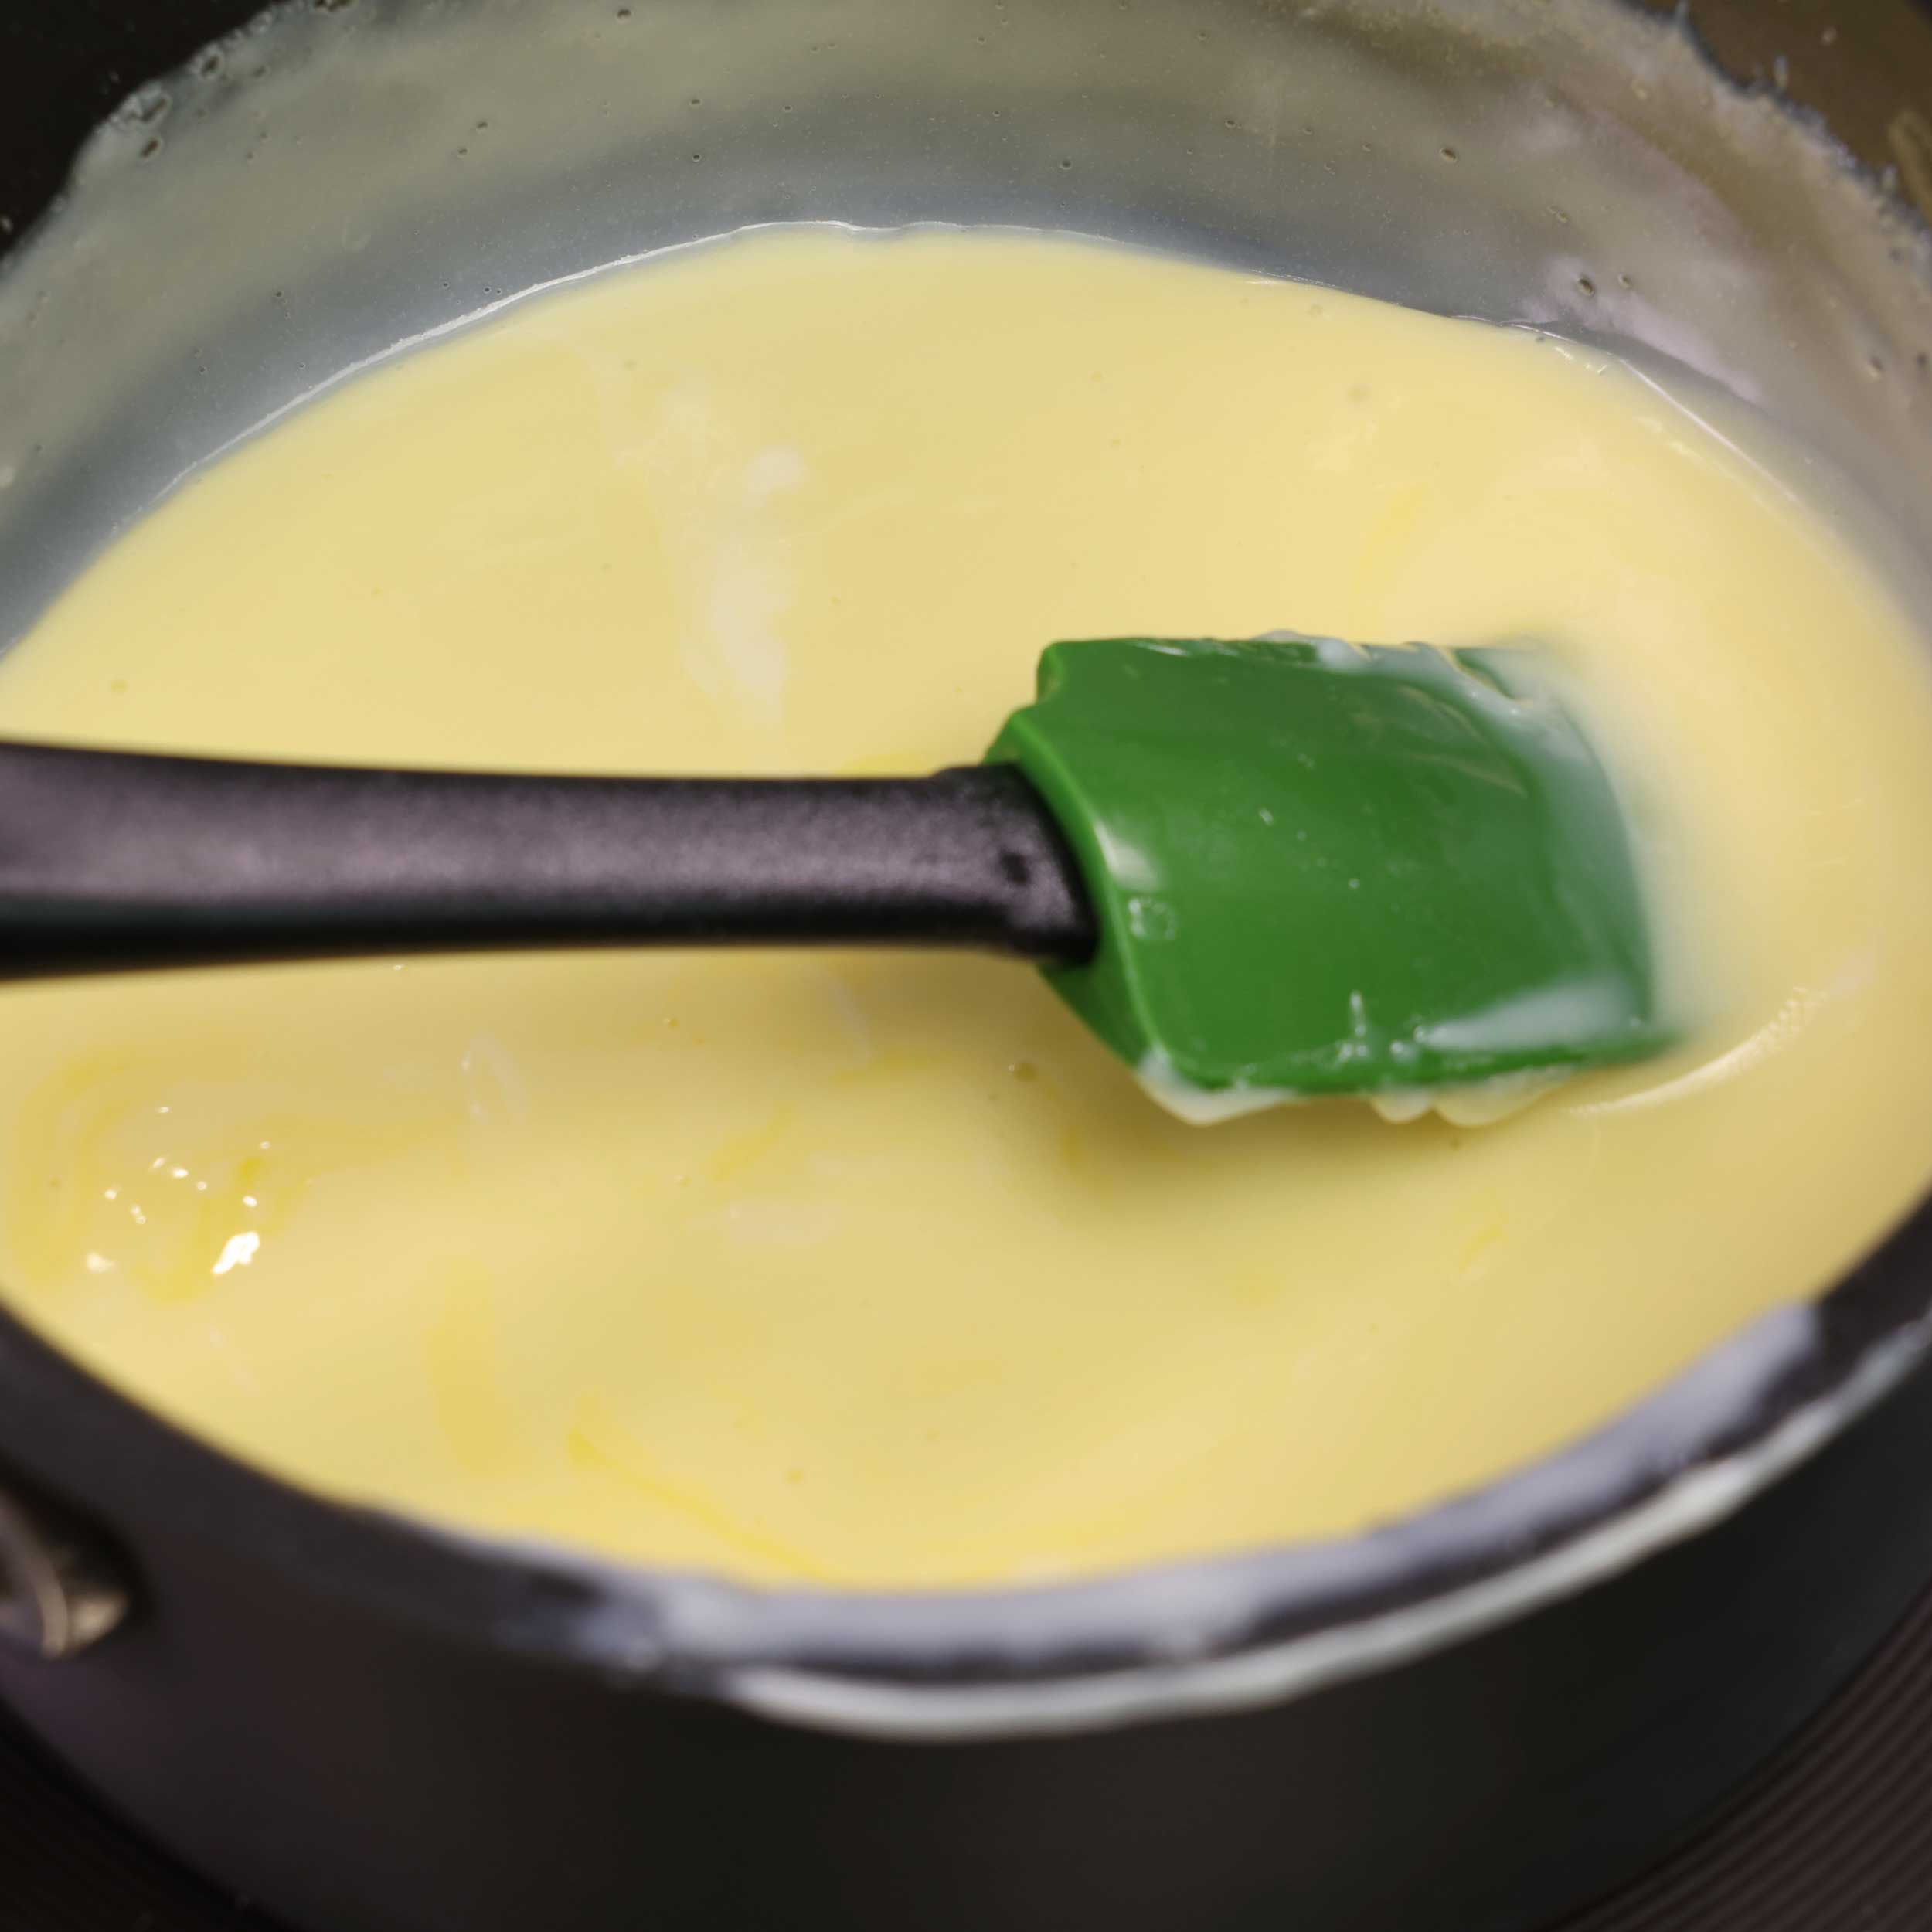
- Cook Until Thickened: Pour the tempered egg mixture back into the saucepan. Return to medium heat and cook, stirring constantly, until it reaches a gentle boil. Let it cook for 1 minute.
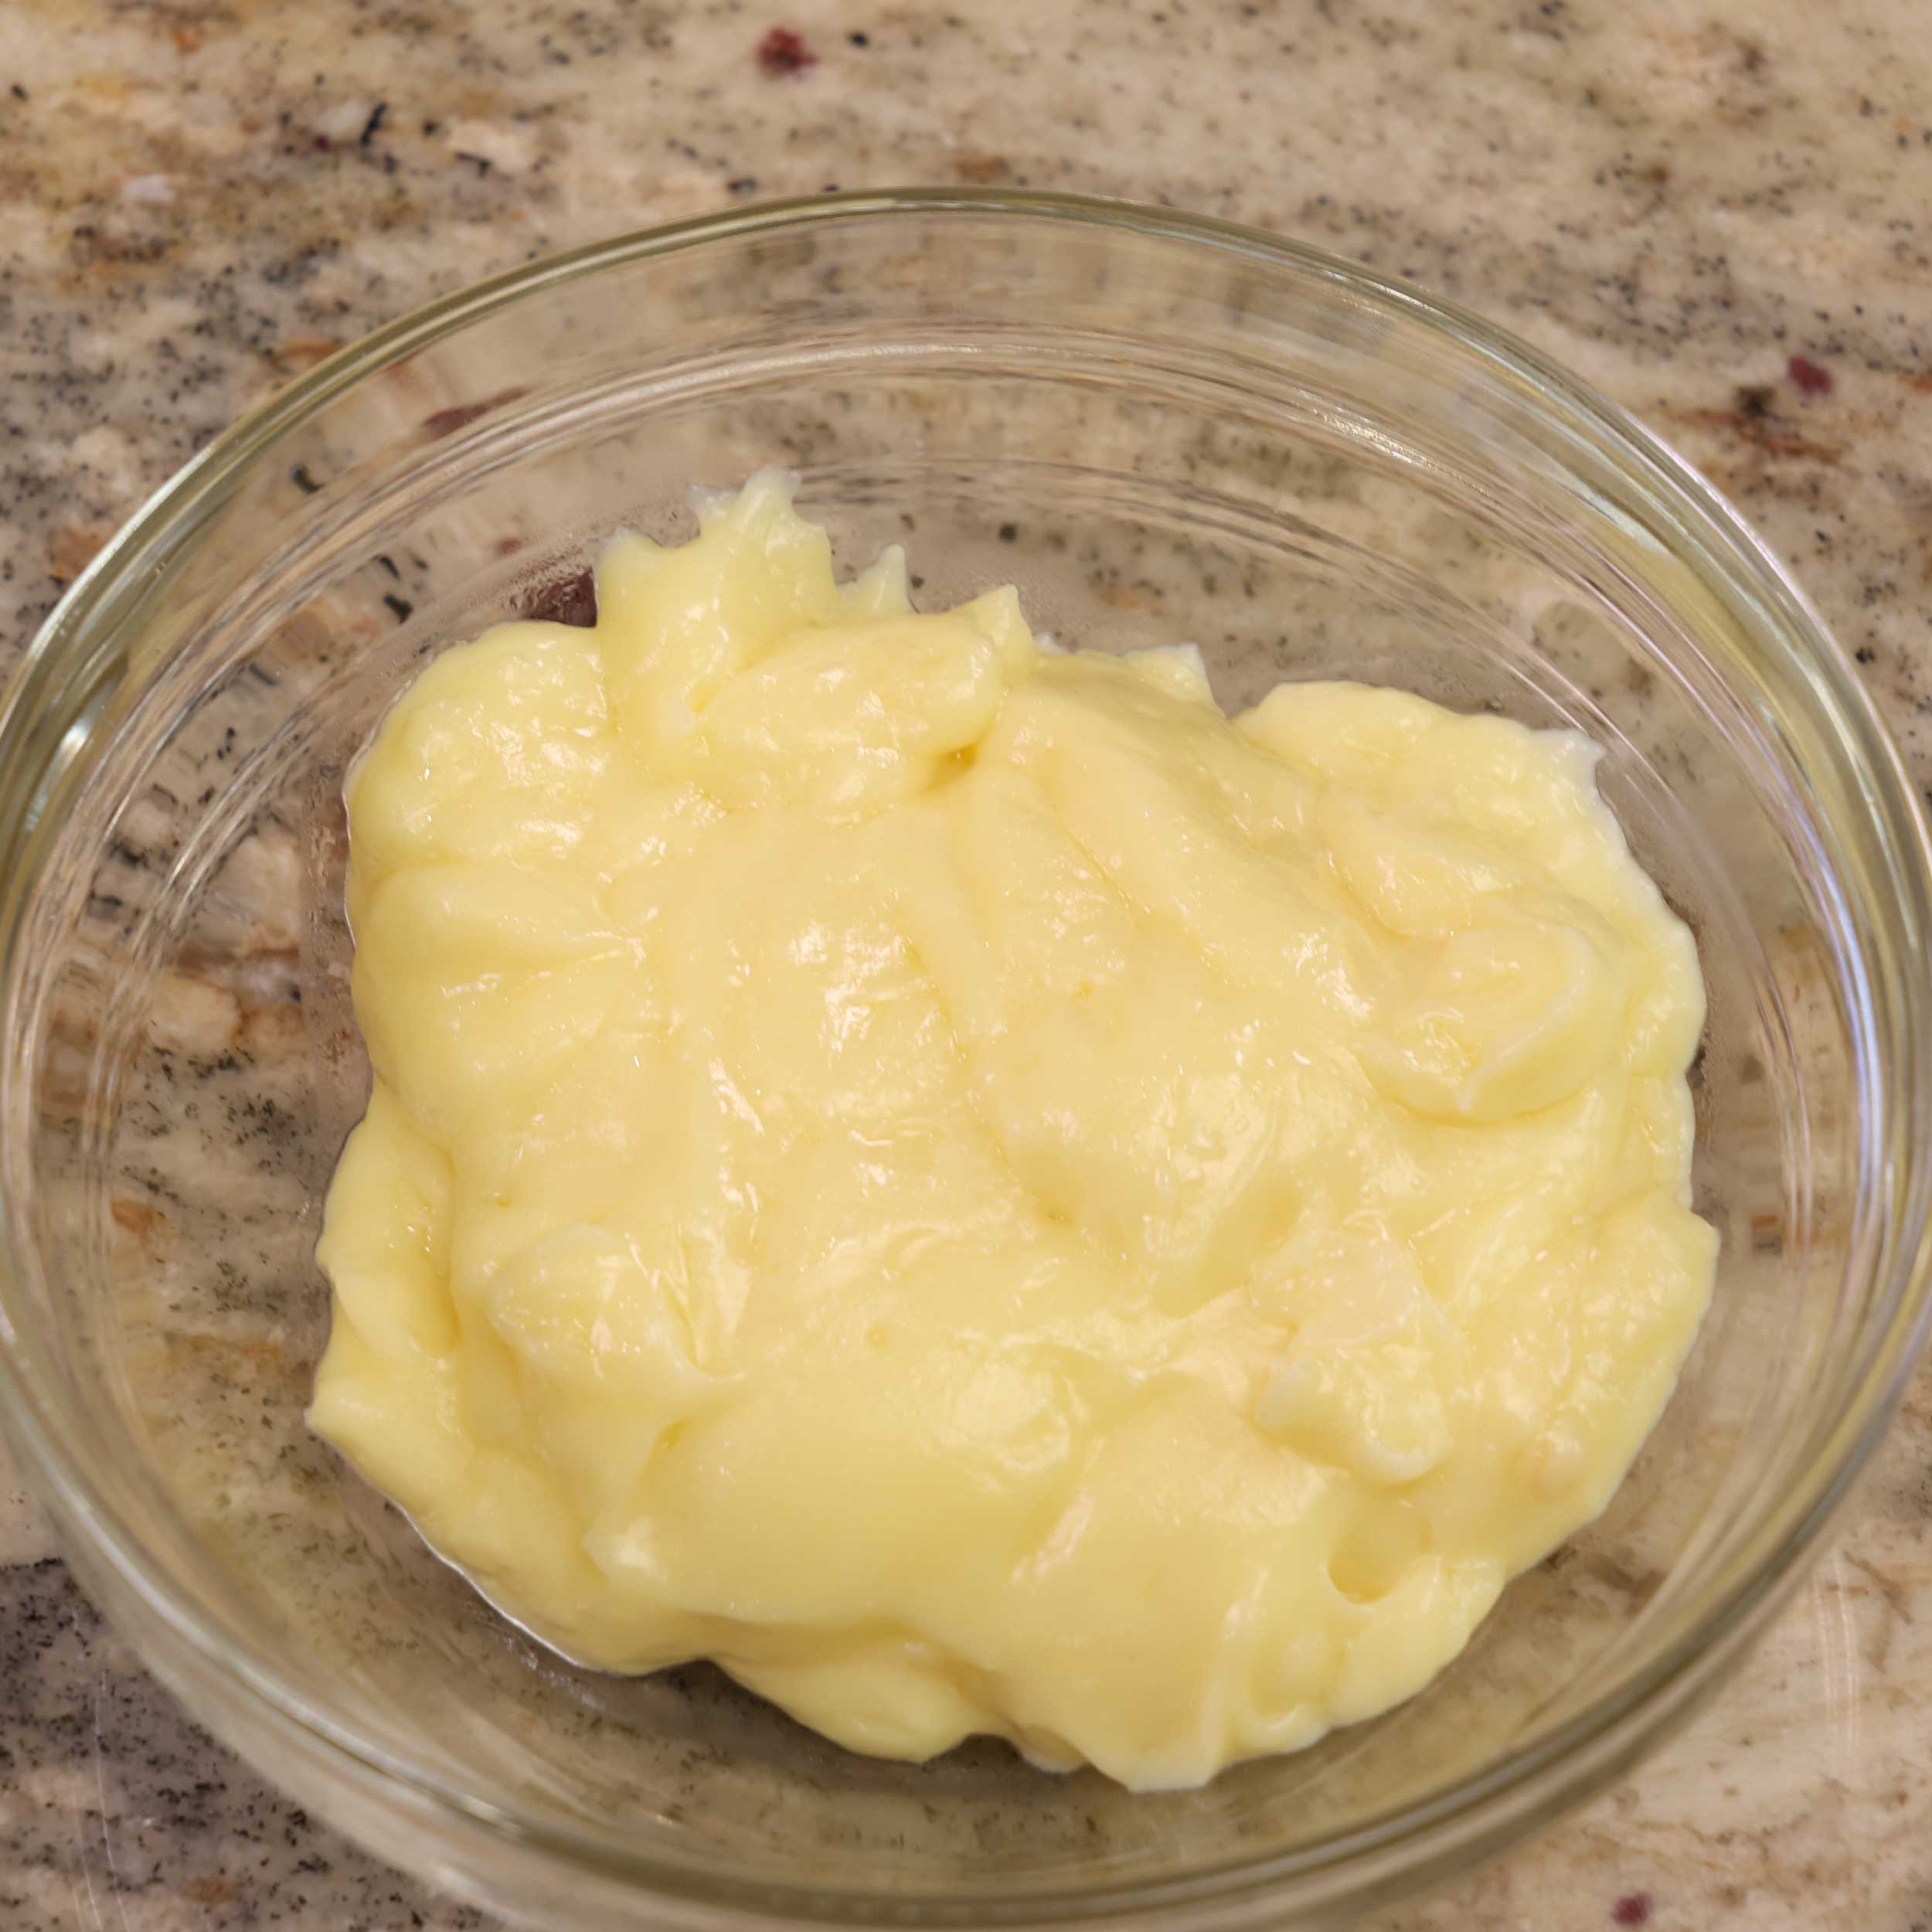
- Add Butter and Vanilla: Remove from heat and stir in butter and vanilla until smooth.
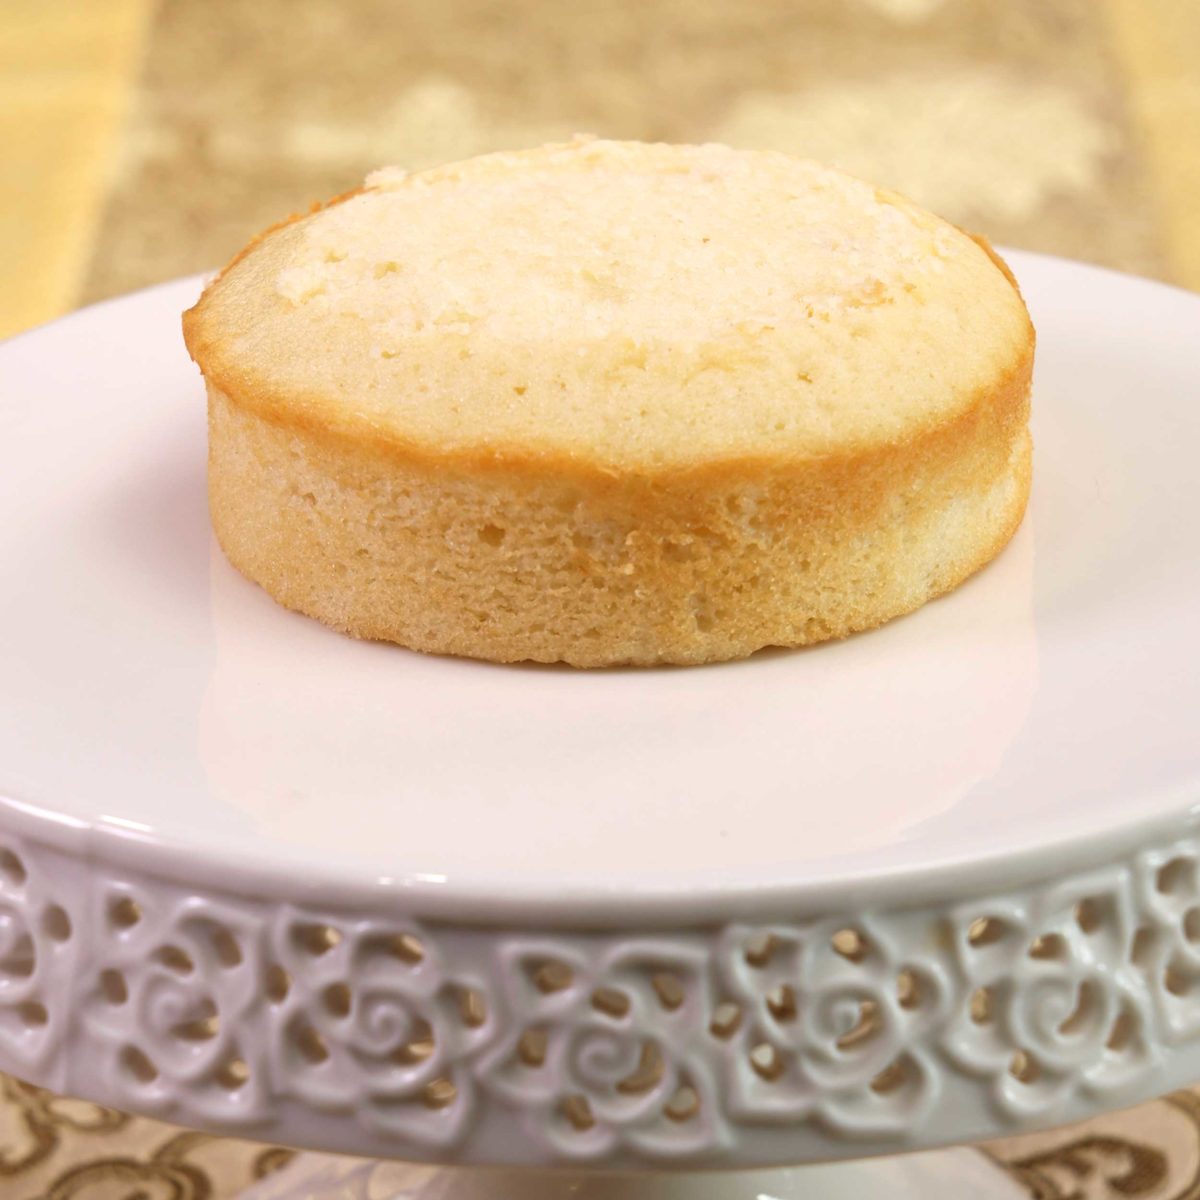
How to Make the Cake
- Preheat Oven: Set the oven to 350°F (177°C).
- Mix Wet Ingredients: In a medium bowl, beat butter, sugar, egg whites, and vanilla with an electric mixer on medium speed until smooth.
- Add Flour: Mix in the self-rising flour until just combined.
- Incorporate Cream: Add the heavy cream and mix until smooth.
- Prepare Ramekins: Lightly butter two 10-ounce ramekins and divide the batter evenly between them.

- Bake: Place ramekins on a baking sheet and bake for 20-25 minutes, or until a toothpick inserted in the center comes out clean.
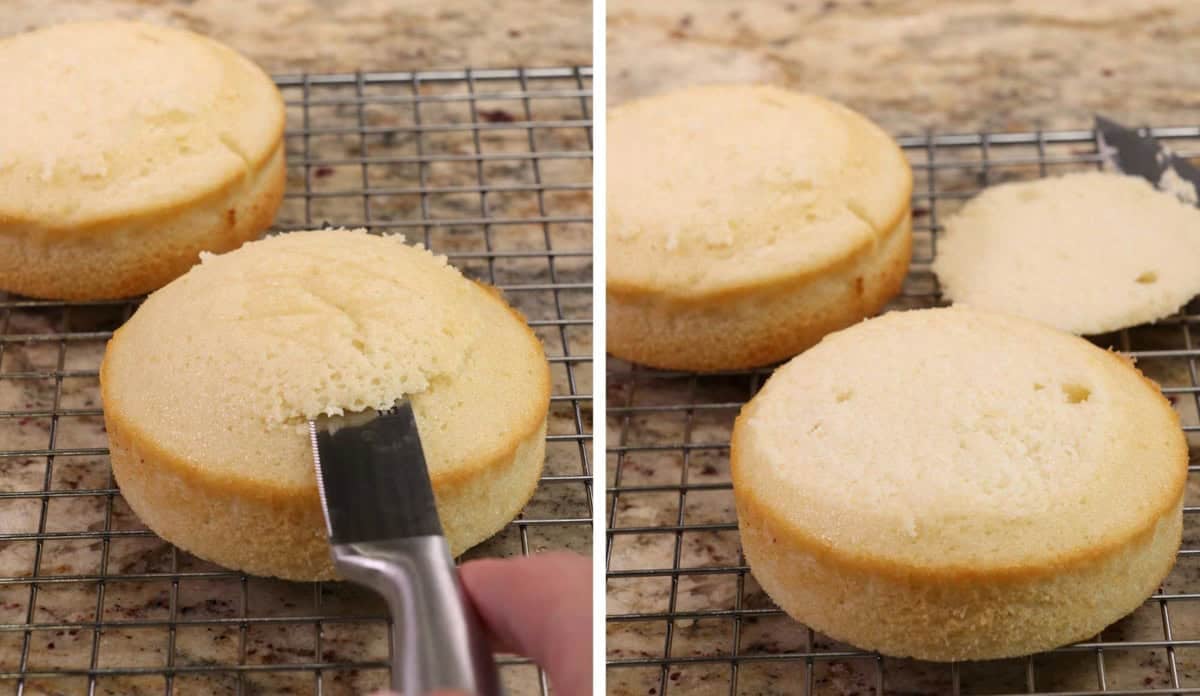
- Cool Cakes: Let the cakes cool in the ramekins for a few minutes, then transfer them to a wire rack to cool completely.
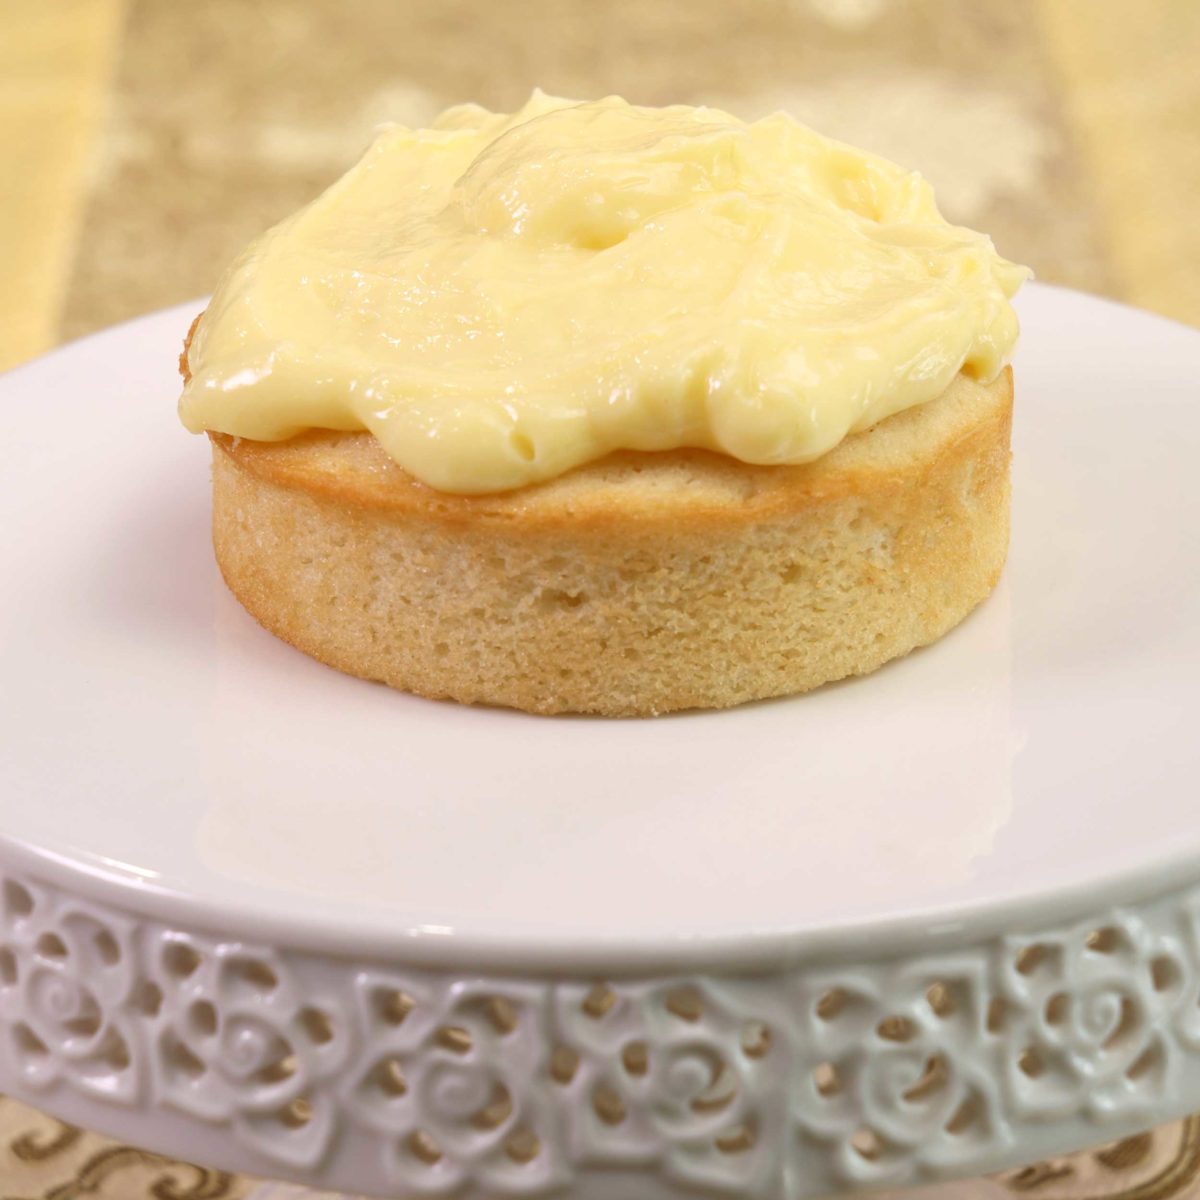
- Check Pastry Cream: About 20 minutes before assembling, remove the pastry cream from the fridge. If it’s too thick or cold, let it soften slightly at room temperature for easier spreading.
- Release Cakes: Run a thin knife around the edges of the cakes to loosen them from the ramekins.
- Level Cakes (Optional): If the tops are domed, trim them with a sharp knife for an even surface.
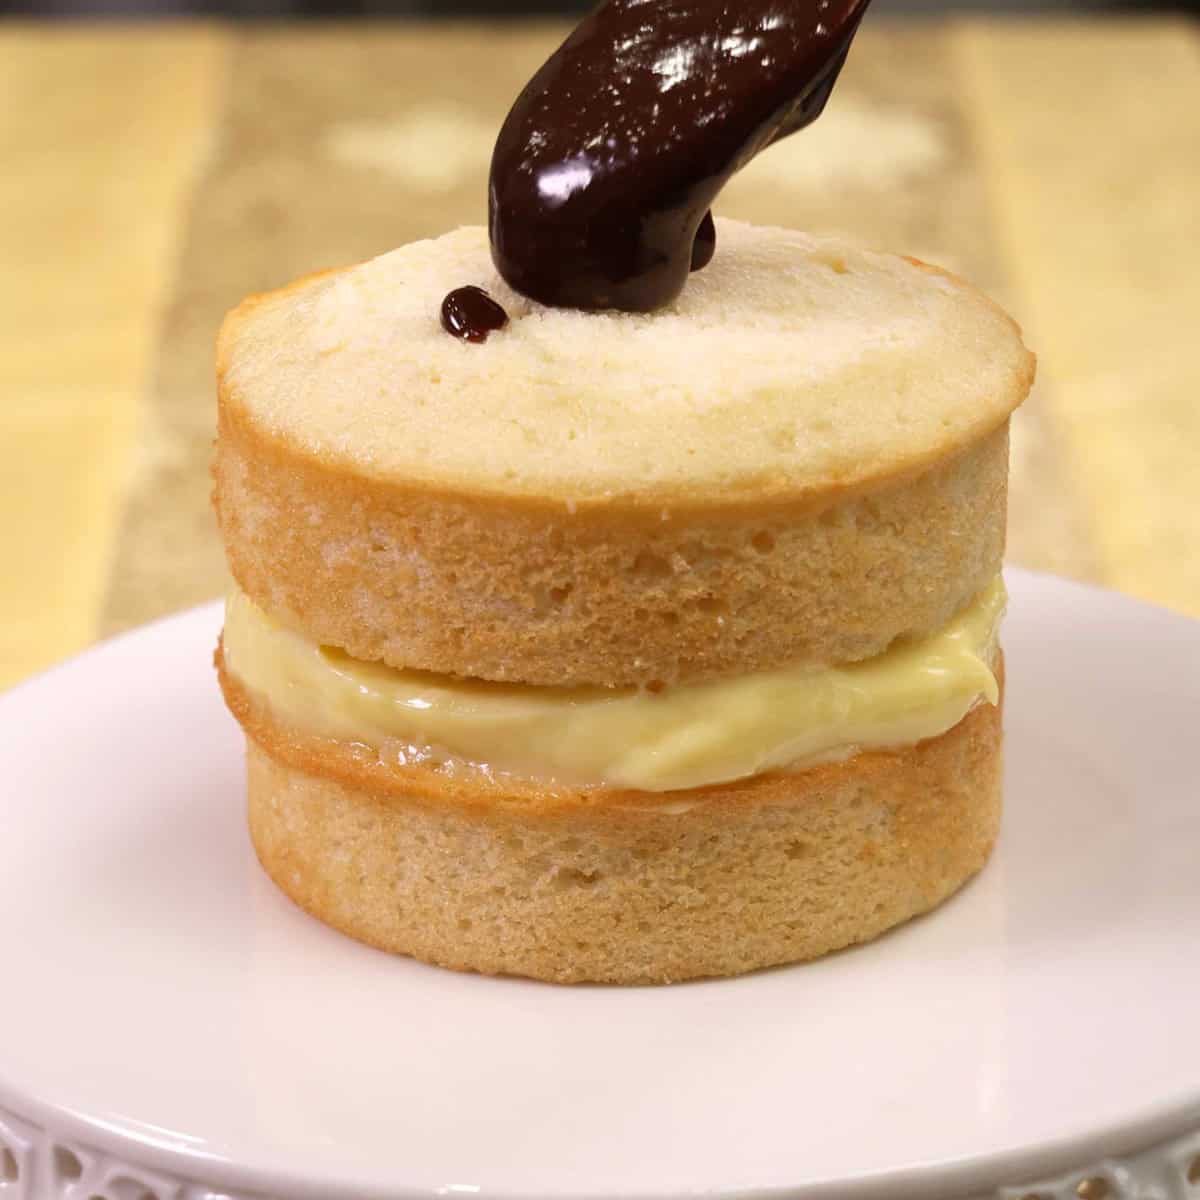
Assembling the Cake
- Layer the Cake: Place one cake layer on a serving plate.
- Add Pastry Cream: Spread the chilled pastry cream evenly over the cake.
- Top with Second Layer: Place the second cake on top and gently press down.
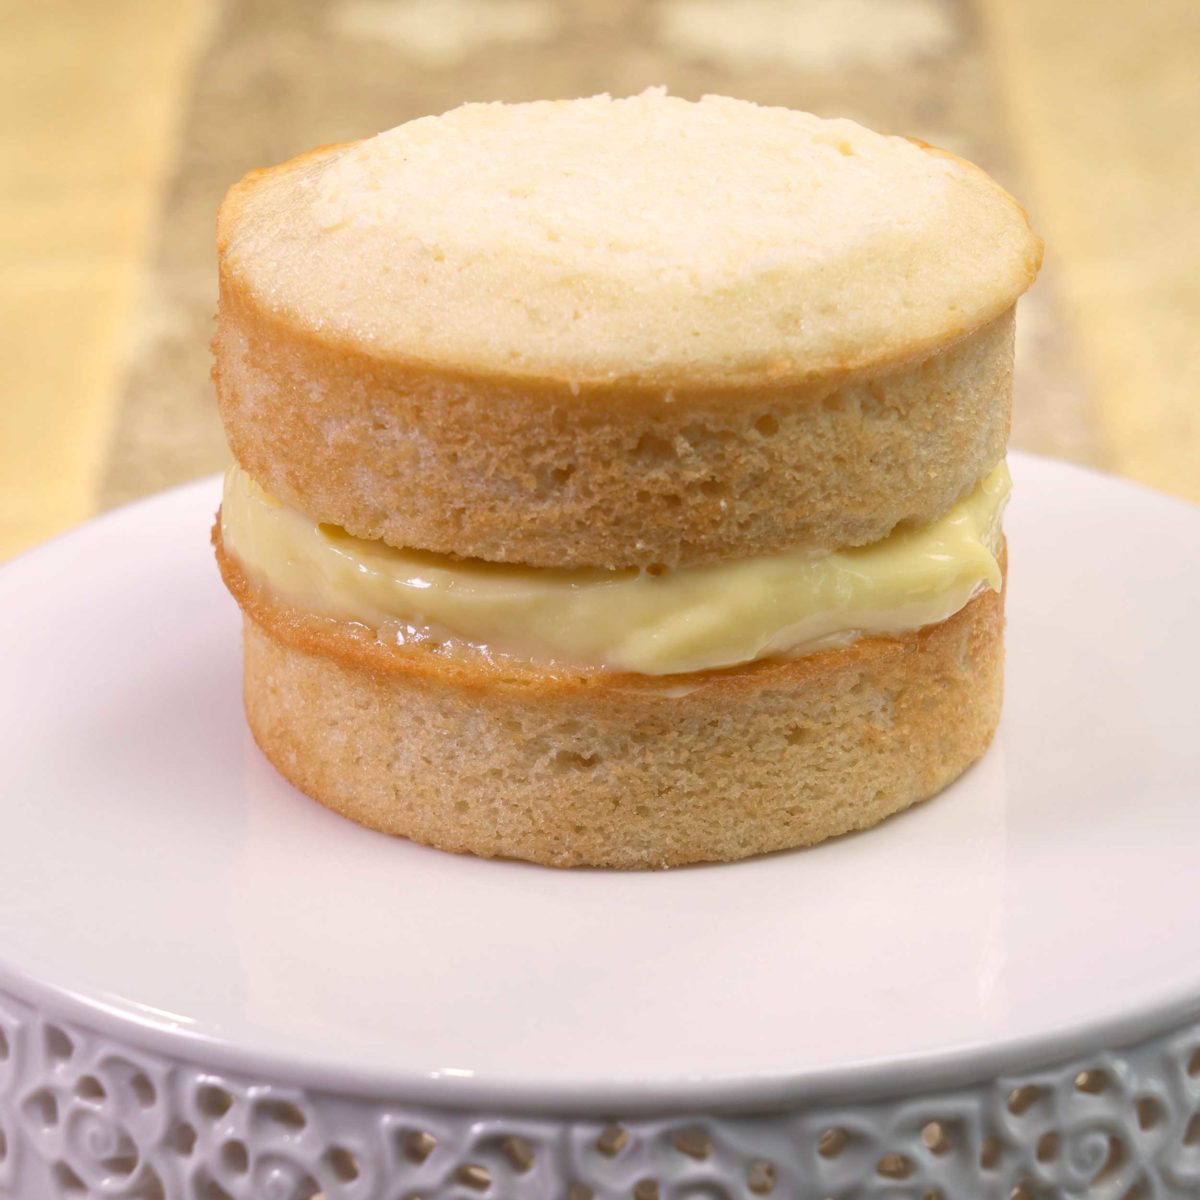
- Chill Before Ganache: Refrigerate the cake while making the ganache. This helps the layers set and makes spreading the ganache easier.
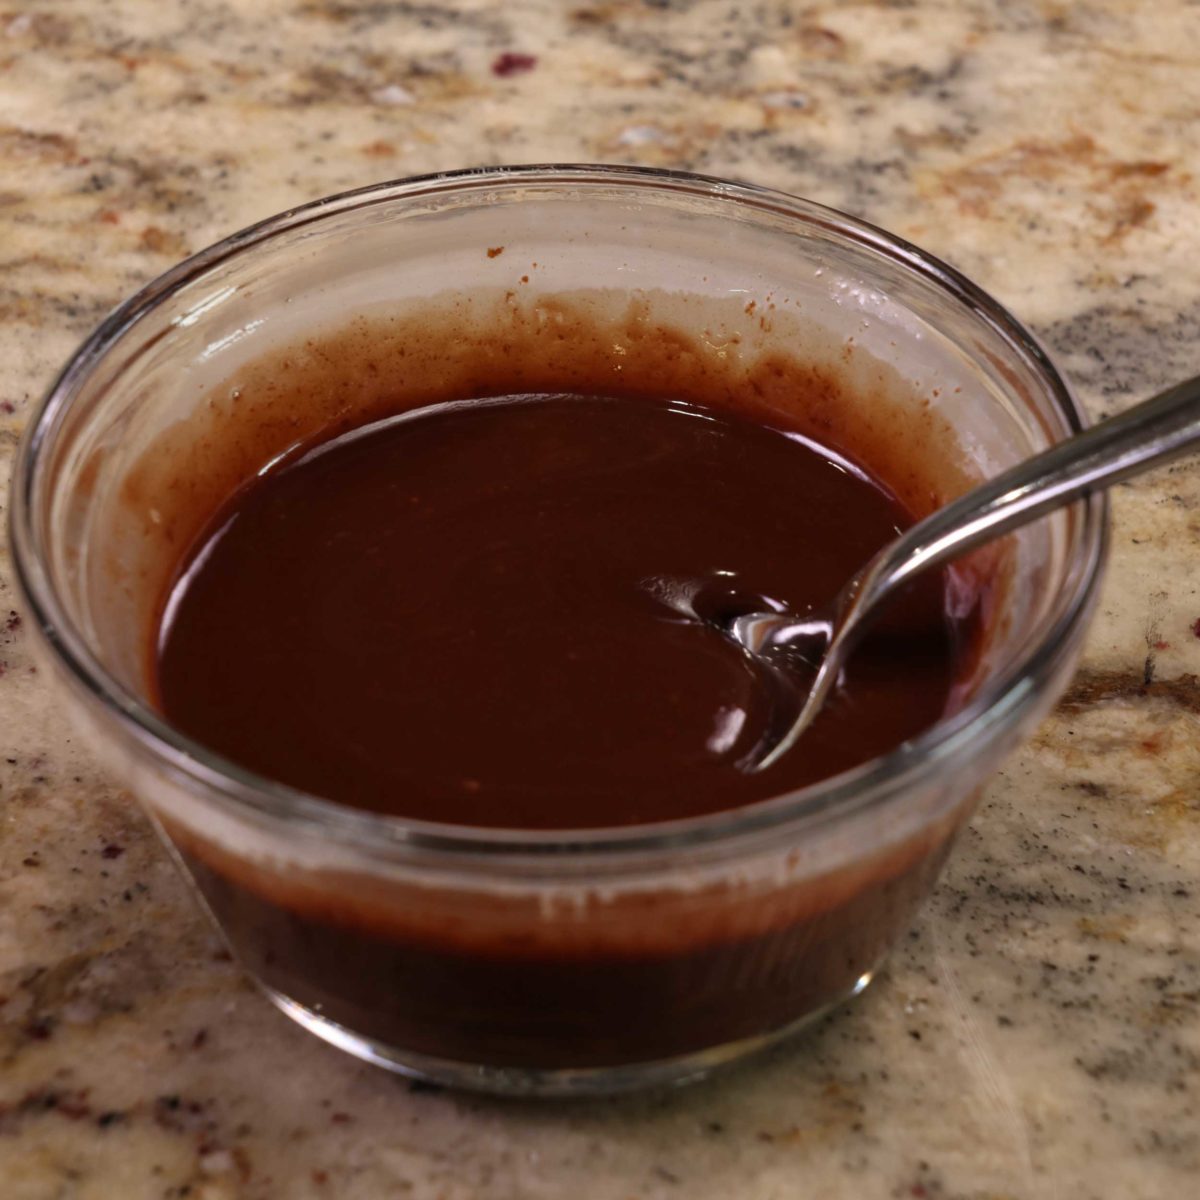
How to Make the Chocolate Ganache
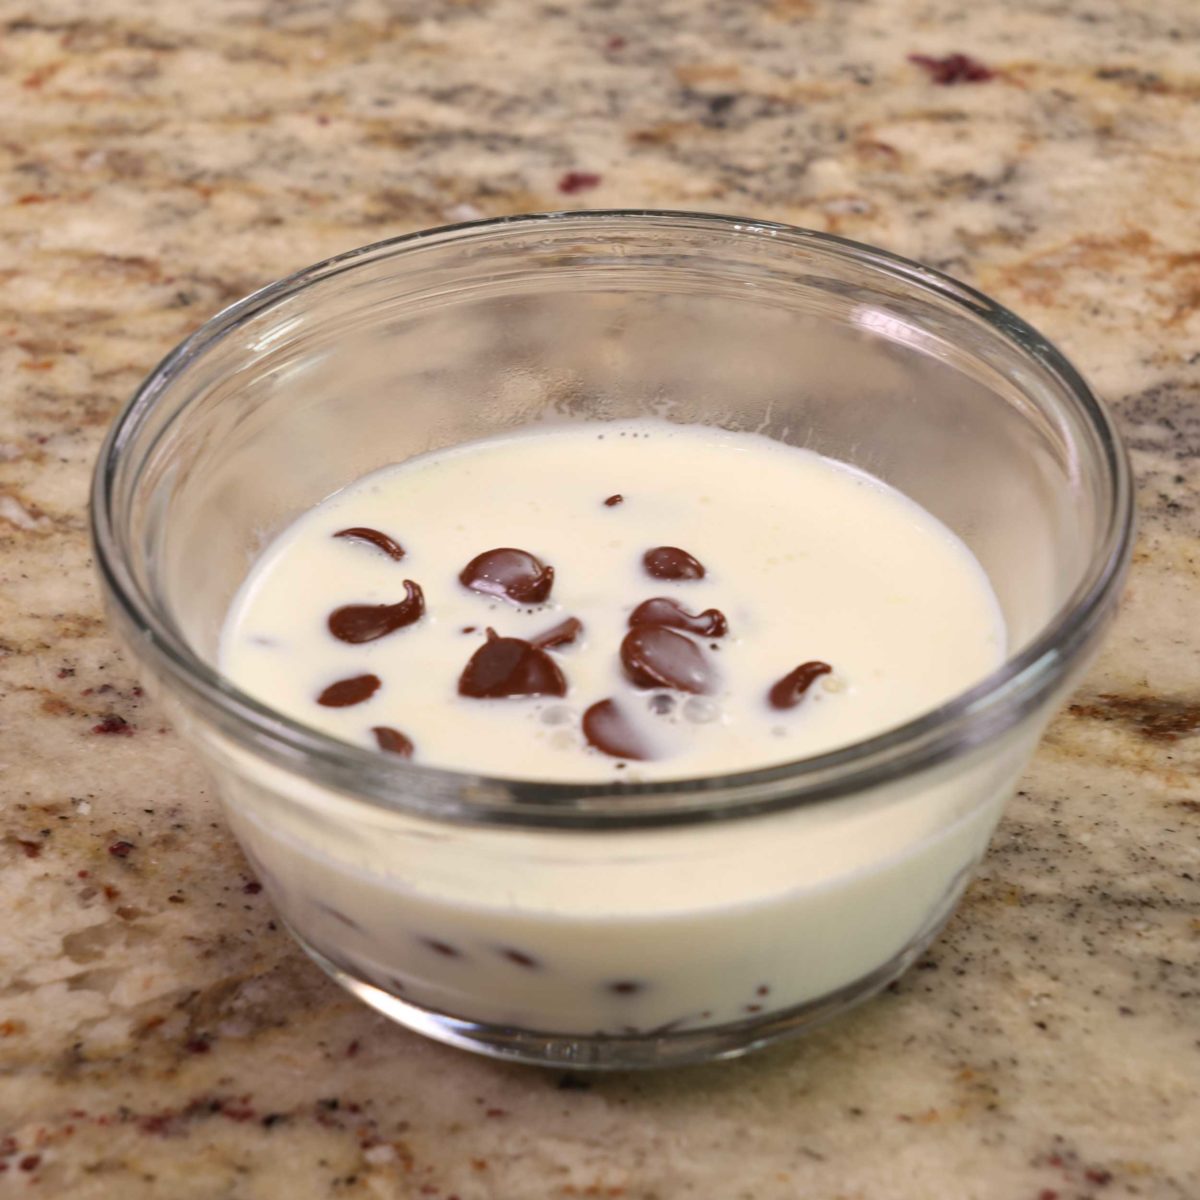
- Prepare the Chocolate: Place chocolate chips in a small bowl.
- Heat the Cream: In a 1-quart saucepan over medium-low heat, warm the heavy cream until it just begins to simmer. You can also heat it in the microwave, watching closely to prevent it from boiling over.
- Melt the Chocolate: Pour the hot cream over the chocolate chips and let it sit for 2-3 minutes. This allows the chocolate to melt without overheating.
- Stir Until Smooth: Gently stir until the chocolate and cream are fully combined and smooth.
- Top the Cake: Pour the ganache over the chilled cake, spreading it evenly to the edges.
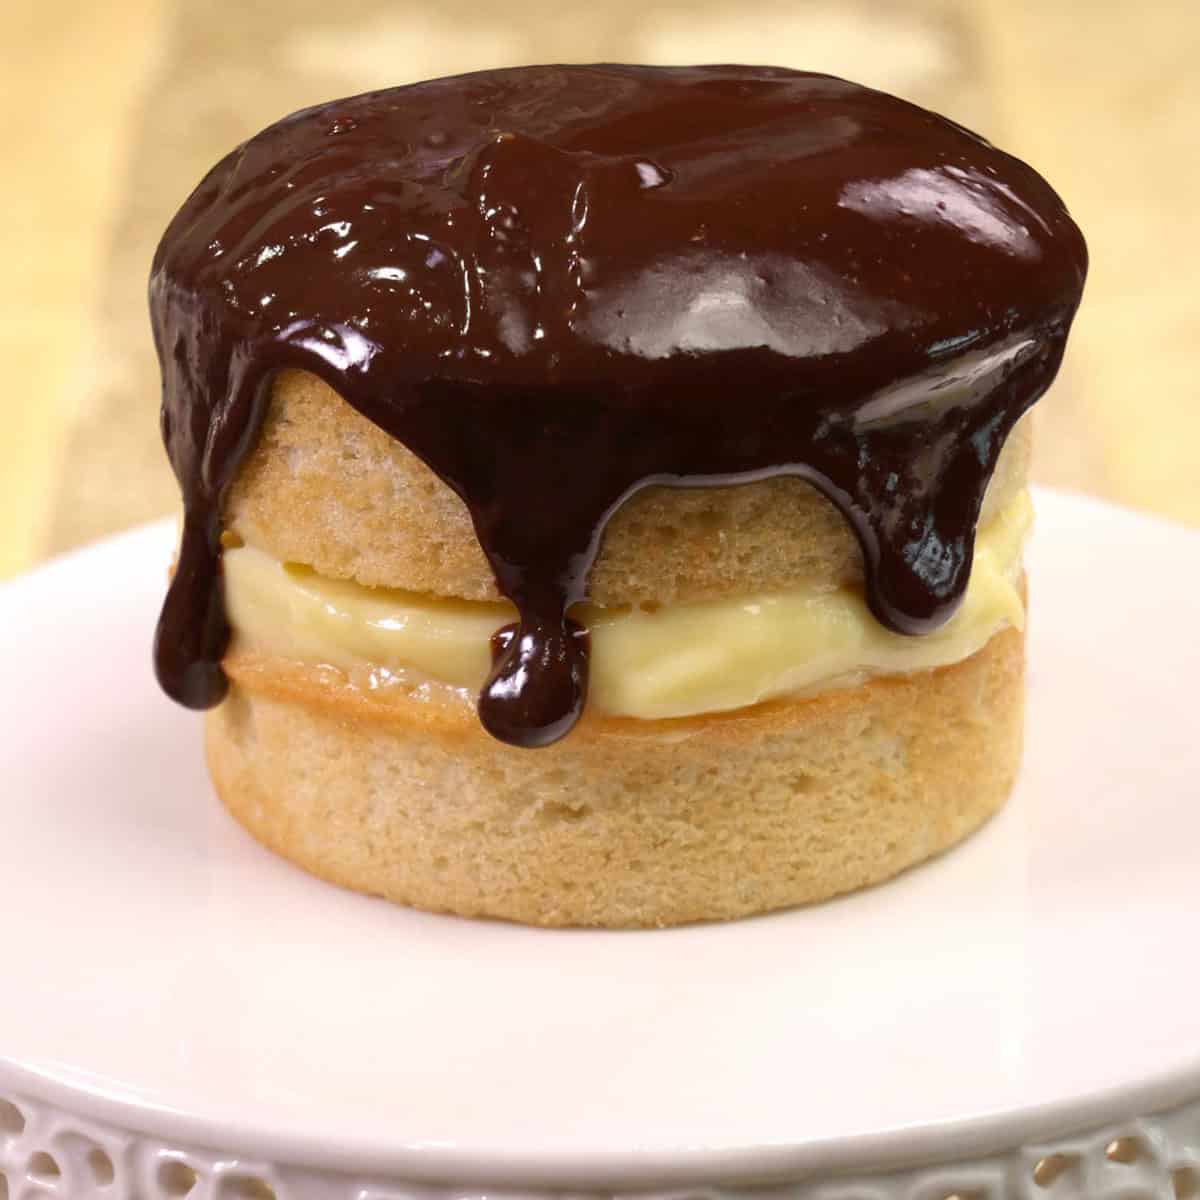
Final Step: Chill the Cake
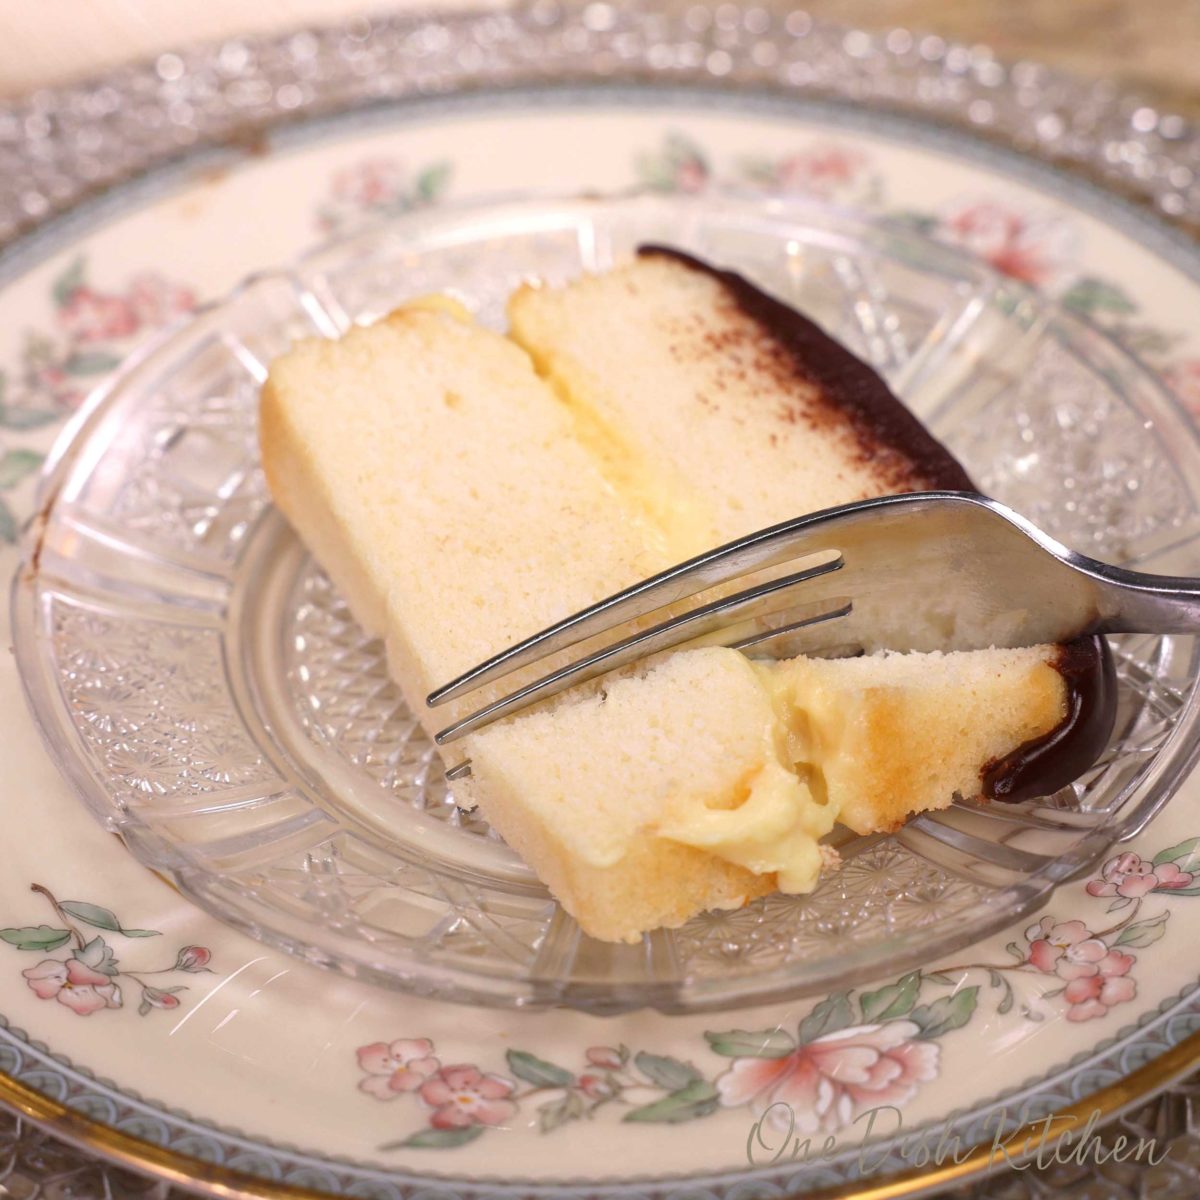
Refrigerate the cake for at least 1 hour before slicing. This helps the ganache set and makes it easier to cut clean, even slices.
Expert Tips
- Use Room Temperature Eggs: This helps the pastry cream cook evenly and gives the cake a lighter texture.
- Grease Ramekins Well: Coat the ramekins with softened butter to ensure the cakes release easily.
- Use the Right Ramekin Size: This recipe is designed for two 10-ounce ramekins (4 inches wide, 1 ¾ inches tall). Larger ramekins will make thinner layers that bake faster, while smaller ones will create thicker layers that take longer.
- Alternative Baking Dish: A 5×5-inch baking dish works too. Bake as a single layer, then cut it in half to create two layers.
- Whisk Pastry Cream Constantly: Keep whisking while cooking to prevent lumps and ensure a smooth, thick consistency.
Frequently Asked Questions
Yes! You can make it up to two days in advance. Store it in an airtight container in the fridge and give it a quick stir before using.
Store in the fridge for up to two days. Cover lightly with plastic wrap or keep in an airtight container to prevent drying out.
The assembled cake doesn’t freeze well, but you can freeze the cake layers separately for up to two months. Wrap them tightly and thaw before assembling.
Ways To Use Leftover Ingredients
If you have any ingredients leftover from this recipe, check out our Leftover Ingredients Recipe Finder or you might like to consider using them in any of these single serving and small batch recipes:

If you’ve tried this Mini Boston Cream Pie or any recipe on One Dish Kitchen please let me know how you liked it by rating the recipe and telling me about it in the comment section below.
If you take a picture please tag us on Instagram (@onedishkitchen) we’d love to see it!
Mini Boston Cream Pie
Watch How To Make This
Equipment
Ingredients
For the Pastry Cream
- 1 large egg yolk
- 2 tablespoons sugar
- 2 teaspoons cornstarch
- ½ cup whole milk
- ½ tablespoon salted butter
- ¼ teaspoon vanilla extract
For the Cake
- 4 tablespoons salted butter -melted
- 5 tablespoons sugar
- 2 large egg whites
- 1 teaspoon vanilla extract
- ½ cup self-rising flour *See note below
- ¼ cup heavy cream
For the Chocolate Ganache
- ¼ cup semi-sweet chocolate chips
- ¼ cup heavy cream
Instructions
Make the Pastry Cream
- Whisk the Egg Yolk: In a small bowl, whisk the egg yolk and set aside.
- Heat the Mixture: In a 1-quart saucepan, whisk together sugar, cornstarch, and milk until smooth. Place over medium heat, whisking constantly until the mixture thickens and starts to bubble. Cook for 1 more minute.
- Temper the Egg Yolk: Slowly add 1 teaspoon of the hot milk mixture to the egg yolk, whisking constantly. Continue adding small amounts, one teaspoon at a time, until fully combined. This prevents the egg from scrambling.
- Cook Until Thickened: Pour the tempered egg mixture back into the saucepan. Return to medium heat and cook, stirring constantly, until it reaches a gentle boil. Let it cook for 1 minute.
- Add Butter and Vanilla: Remove from heat and stir in butter and vanilla until smooth.
- Chill the Pastry Cream: Transfer the cream to a bowl, cover, and refrigerate until ready to use as filling. This step ensures the cream is well-set and easy to work with.
Make the Cake
- Preheat Oven: Set the oven to 350°F (177°C).
- Mix Wet Ingredients: In a medium bowl, beat butter, sugar, egg whites, and vanilla with an electric mixer on medium speed until smooth.
- Add Flour: Mix in the self-rising flour until just combined.
- Incorporate Cream: Add the heavy cream and mix until smooth.
- Prepare Ramekins: Lightly butter two 10-ounce ramekins and divide the batter evenly between them.
- Bake: Place ramekins on a baking sheet and bake for 20-25 minutes, or until a toothpick inserted in the center comes out clean.
- Cool Cakes: Let the cakes cool in the ramekins for a few minutes, then transfer them to a wire rack to cool completely.
- Check Pastry Cream: About 20 minutes before assembling, remove the pastry cream from the fridge. If it’s too thick or cold, let it soften slightly at room temperature for easier spreading.
- Release Cakes: Run a thin knife around the edges of the cakes to loosen them from the ramekins.
- Level Cakes (Optional): If the tops are domed, trim them with a sharp knife for an even surface.
Assemble the Cake
- Layer the Cake: Place one cake layer on a serving plate.
- Add Pastry Cream: Spread the chilled pastry cream evenly over the cake.
- Top with Second Layer: Place the second cake on top and gently press down.
- Chill Before Ganache: Refrigerate the cake while making the ganache. This helps the layers set and makes spreading the ganache easier.
Make the Chocolate Ganache
- Prepare the Chocolate: Place chocolate chips in a small bowl.
- Heat the Cream: In a 1-quart saucepan over medium-low heat, warm the heavy cream until it just begins to simmer. You can also heat it in the microwave, watching closely to prevent it from boiling over.
- Melt the Chocolate: Pour the hot cream over the chocolate chips and let it sit for 2-3 minutes. This allows the chocolate to melt without overheating.
- Stir Until Smooth: Gently stir until the chocolate and cream are fully combined and smooth.
- Top the Cake: Pour the ganache over the chilled cake, spreading it evenly to the edges.
- Chill the Cake: Refrigerate the cake for at least 1 hour before slicing. This helps the ganache set and makes it easier to cut clean, even slices.
Notes
-
- Use Room Temperature Eggs: This helps the pastry cream cook evenly and gives the cake a lighter texture.
-
- Grease Ramekins Well: Coat the ramekins with softened butter to ensure the cakes release easily.
-
- Use the Right Ramekin Size: This recipe is designed for two 10-ounce ramekins (4 inches wide, 1 ¾ inches tall). Larger ramekins will make thinner layers that bake faster, while smaller ones will create thicker layers that take longer.
-
- Alternative Baking Dish: A 5×5-inch baking dish works too. Bake as a single layer, then cut it in half to create two layers.
-
- Whisk Pastry Cream Constantly: Keep whisking while cooking to prevent lumps and ensure a smooth, thick consistency.
- Making Your Own Self-Rising Flour
- Mix 1 cup all-purpose flour with 1 ½ teaspoons baking powder and ¼ teaspoon salt.
Nutrition
The information shown is an estimate provided by an online nutrition calculator. It should not be considered a substitute for a professional nutritionist’s advice.


May I make the cakes ahead of time and freeze them for a week before assembling the finished desserts?
Yes, you can make the cake layers ahead and freeze them for up to 2 months. Let the cakes cool completely, then wrap each layer well in plastic wrap and place them in a freezer-safe bag or container. Thaw them in the refrigerator or at room temperature before assembling with the pastry cream and ganache. I would wait to make and add the pastry cream and ganache until you’re ready to assemble the dessert.
Hi! This was fantastic, however my pastry cream came out pretty the. And did not set up as much as I would have liked. Any suggestions? The flavor was awesome. This was my first time making pastry cream like this, do you think I should have cooked it longer?
I’m so glad you enjoyed the flavor of the Boston Cream Pie! It sounds like the pastry cream might not have set properly because it could have been undercooked. When making the pastry cream, it’s important to bring the cornstarch and milk mixture to a boil and then continue cooking it for about another minute. This helps the cream thicken properly. Also, make sure you’re whisking constantly to avoid any lumps and to ensure even cooking. I hope this helps, and I’m sure your next attempt will turn out perfectly!
This made a lovely birthday cake for my husband and me. Excellent step by step instructions, the resulting cake was tender and delicious. As a native Bostonian I’ve had many Boston cream pies and was happy that mine was every bit as good as others I’ve had and better than many. I love small dessert recipes, I can treat us to a yummy home baked treat and not have leftovers for days.
Thank you so much, Jean. I’m so happy to know you and your husband enjoyed the dessert. I appreciate your feedback.
My wife made it, and it’s as good as it looks, folks. The cake, the chocolate, the filling: all came out perfectly.
I made this today for my 35th anniversary. The ganache came out very very thin, I added 1/4 cup more melted choc. Chips.
Can u double for a little larger cake ?
Yes.
Can you use almond milk in the pastry cream?
Kimberly, I haven’t used almond milk as a substitute for cow’s milk in the pastry cream but I don’t see why it wouldn’t work. The lower fat content in the almond milk might make the cream a bit thinner, so keep that in mind when you are making it.