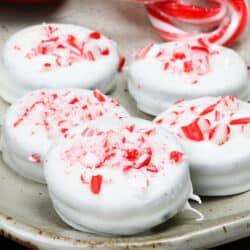
Small Batch Chocolate Covered Oreos
Make a small batch of delicious Chocolate Covered Oreos with just two ingredients. This quick, no-bake dessert features crunchy Oreos dipped in smooth, glossy chocolate, perfect for holidays, parties, or gifting.
Servings: 12 cookies
Ingredients
- 12 Oreo cookies or use another brand of sandwich cookie
- 8 ounces chocolate candy melts -use white or milk chocolate, or both
- sprinkles (optional)
Instructions
- Line a baking sheet with parchment or wax paper and set it aside.
- Melt the chocolate according to the package directions. If using a microwave, heat in 15-second intervals, stirring between each until smooth. Want to melt chocolate without a microwave? See the Notes below for an easy water bath method.
- Using a fork, dip one Oreo at a time into the melted chocolate. Turn to coat fully, then lift and gently tap the fork on the bowl’s edge to remove excess chocolate. Place coated Oreos on the prepared baking sheet.
- While the chocolate is still soft, add sprinkles or toppings. For a chocolate drizzle, let the first layer harden, then drizzle melted chocolate of another kind over the top.Pro Tip: Have fun with decorating! Try drizzling, piping designs, or dipping half an Oreo in each color for a marbled look.
Notes
- Use Quality Chocolate: Choose high-quality chocolate or melting wafers for a smooth, glossy finish and rich flavor.
- Melt Slowly: Heat chocolate in 15-second intervals, stirring each time. Avoid overheating to prevent dull or grainy chocolate.
- Dip with a Fork: A fork helps coat Oreos evenly and lets excess chocolate drip off easily.
- Let Them Set: Allow the chocolate to harden completely before handling for a clean, professional look.
- Avoid Moisture: Keep water out of your melted chocolate, just a few drops can cause it to seize.
- Store Properly: Store chocolate-covered Oreos in an airtight container at room temperature for up to 2 weeks, or refrigerate if your kitchen is warm.
- Fill a small saucepan with 1 inch of water and bring it to a gentle simmer.
- Place a heatproof glass or metal bowl over the saucepan, making sure it doesn’t touch the water.
- Add chocolate pieces to the bowl. Stir frequently as they melt, about 3–4 minutes.
- Carefully remove the bowl and wipe the bottom dry before dipping your Oreos.
Nutrition
Serving: 1cookie | Calories: 131kcal | Carbohydrates: 19g | Protein: 2g | Fat: 7g | Saturated Fat: 1g | Polyunsaturated Fat: 0.4g | Monounsaturated Fat: 1g | Trans Fat: 0.01g | Sodium: 47mg | Potassium: 28mg | Fiber: 0.3g | Sugar: 14g | Vitamin A: 0.2IU | Calcium: 3mg | Iron: 1mg
QR code
Scan this QR code with your phone's camera to view this recipe on your mobile device.
