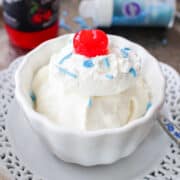
Vanilla Ice Cream For One
Whip up this rich and creamy single serve Vanilla Ice Cream without an ice cream machine! This simple three-ingredient recipe is ideal for a fast and delightful treat.
Servings: 2 servings
Equipment
Ingredients
- 4 ounces heavy cream
- 2 ounces sweetened condensed milk
- ½ teaspoon vanilla extract
Instructions
- Begin by pouring the cream into a medium-sized bowl. Use an electric mixer or a hand whisk to whip the cream until stiff peaks form.Pro Tip: You'll know you've achieved stiff peaks when the cream forms a sharp peak that holds its shape when you lift the beater.
- Next, gently fold the sweetened condensed milk into the whipped cream.
- Carefully fold in the vanilla extract. Pro Tip: Initially, the mixture might appear lumpy. Continue folding until it becomes soft and silky, but be mindful of a few small lumps. Avoid over-mixing to prevent the mixture from deflating.
- Once your mixture is ready, transfer it to a freezer-safe bowl, ensuring it's covered tightly. For soft-serve consistency, freeze for a minimum of 2 hours. For firmer ice cream, freeze for 6 to 8 hours.
Notes
This no-churn vanilla ice cream is incredibly creamy and rich, offering an easy and egg-free recipe. Simple ingredients combine to create a delightful dessert that's both easy and impressive. No cooking is required, making this an ideal recipe for quick, homemade ice cream that tastes like a dream.
Expert Tips
Selecting the Right Cream: Use heavy cream or heavy whipping cream with a minimum of 35% fat content. This high-fat content is essential for achieving the creamy, rich texture that makes this ice cream so delightful.
Ingredient Integrity: Stick to the specified ingredients in the recipe. Avoid substitutions like lower fat or lower sugar alternatives. These changes can significantly affect the texture and taste, potentially leading to less than satisfying results.
Prep for Whipping Cream: Chilled tools make a big difference. For optimal whipping, place your mixing bowl in the freezer for 5-10 minutes before you start. Additionally, keep the cream in the refrigerator right up until you need it. This helps in achieving a better, more stable whip.
Proper Storage: To store your homemade vanilla ice cream, ensure the top of the container is sealed tightly. This prevents freezer burn and maintains the quality of the ice cream, ensuring every scoop is as good as the first.
Nutrition
Serving: 1serving | Calories: 313kcal | Carbohydrates: 17g | Protein: 4g | Fat: 23g | Saturated Fat: 15g | Polyunsaturated Fat: 1g | Monounsaturated Fat: 6g | Cholesterol: 74mg | Sodium: 51mg | Potassium: 159mg | Sugar: 17g | Vitamin A: 909IU | Vitamin C: 1mg | Calcium: 118mg | Iron: 1mg