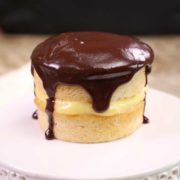
Mini Boston Cream Pie
This Mini Boston Cream Pie is actually not a pie at all. It consists of two light vanilla cake layers separated by glorious vanilla pastry cream and topped with chocolate ganache. This mini cake is a smaller version of the classic recipe and is the perfect size for serving one or two people.
Servings: 4 servings
Ingredients
For the Pastry Cream
- 1 large egg yolk
- 2 tablespoons sugar
- 2 teaspoons cornstarch
- ½ cup whole milk
- ½ tablespoon salted butter
- ¼ teaspoon vanilla extract
For the Cake
- 4 tablespoons salted butter , melted
- 5 tablespoons sugar
- 2 large egg whites
- 1 teaspoon vanilla extract
- ½ cup self-rising flour (See note below)
- ¼ cup heavy cream
For the Chocolate Ganache
- ¼ cup semi-sweet chocolate chips
- ¼ cup heavy cream
Instructions
Make the Pastry Cream
- Prepare the Egg Yolk: Begin by whisking the egg yolk in a small bowl and set it aside.
- Combine Dry and Wet Ingredients: In a 1-quart saucepan, mix together sugar, cornstarch, and milk until smooth.
- Cook the Mixture: Place the saucepan over medium heat. Whisk constantly as the mixture starts to thicken and bubble. Keep whisking for an additional minute to ensure an even consistency.
- Temper the Egg Yolk: To temper, gradually introduce the hot milk mixture to the egg yolk. Start by adding 1 teaspoon of the hot mixture into the egg yolk, whisking continuously. Slowly add the rest, teaspoon by teaspoon, to avoid cooking the egg. This process gently increases the egg's temperature without scrambling it.
- Combine and Cook: Pour the tempered egg mixture back into the saucepan and return to medium heat. Bring it to a light boil, stirring constantly, and let it cook for one minute.
- Finish with Butter and Vanilla: Remove from heat. Stir in butter and vanilla until the mixture is smooth.
- Chill the Pastry Cream: Transfer the cream to a bowl, cover, and refrigerate until ready to use as filling. This step ensures the cream is well-set and easy to work with.
Make the Cake
- Preheat Oven: Start by heating your oven to 350 degrees F (177 degrees C).
- Mix Wet Ingredients: In a medium-sized bowl, use an electric hand mixer on medium speed to beat together the butter, sugar, egg whites, and vanilla until the mixture is smooth.
- Add Flour: Gently mix in the self-rising flour for a few seconds, just until it's incorporated.
- Incorporate Cream: Add the cream to the mixture and blend until smooth.
- Prepare Ramekins: Evenly divide the batter between two 10-ounce ramekins.
- Bake the Cake: Place the ramekins in the oven and bake for 20-25 minutes. Check doneness by inserting a toothpick into the center of each cake; it should come out clean.
- Cooling Process: After baking, let the cakes cool completely on a wire rack. Meanwhile, check the pastry cream in the fridge. About 20 minutes before assembly, take out the pastry cream. If it's too thick or cold, it might not spread well.
- Release Cakes from Ramekins: Once cooled, use a thin knife to loosen the edges of the cakes from the ramekins.
- Level the Cakes (Optional): If the cakes have domed tops, you can level them with a sharp knife for a flat surface, which helps when layering with pastry cream and adding the second cake layer.
Assembling the Cake
- Start with the First Layer: Place one layer of the cooled cake on your serving plate.
- Add Pastry Cream: Spread the chilled and thickened pastry cream evenly over this first cake layer.
- Top with Second Layer: Carefully place the second cake layer on top of the pastry cream and gently press down to secure it.
- Chill Before Ganache: Put the assembled cake in the refrigerator while you prepare the chocolate ganache. This chilling step helps the layers to set and makes the final ganache topping easier to apply.
Make the Chocolate Ganache
- Prepare Chocolate: Begin by placing the chocolate chips in a small bowl.
- Heat the Cream: In a 1-quart saucepan, heat the heavy cream over medium-low heat until it gently simmers. Alternatively, you can heat the cream in the microwave, but be cautious to avoid letting it boil over. Watch it closely until it starts to bubble.
- Combine Cream and Chocolate: Pour the hot cream over the chocolate chips and let it sit for 2-3 minutes. This resting period allows the chocolate to melt smoothly and the cream's temperature to lower. If you whisk too soon while the cream is still very hot, the ganache might become gritty.
- Stir Gently: After allowing time for the chocolate to melt, stir the cream and chocolate chips together slowly to create a smooth ganache.
- Top the Cake: Pour the finished ganache over the top of your chilled cake, spreading it to the edges for a beautiful, glossy finish.
- Chill the Cake: After adding the ganache, refrigerate the cake for at least 1 hour. This allows it to firm up sufficiently for easy slicing. Ensuring the cake is properly chilled is key to achieving clean, neat slices and maintaining the integrity of each delicious layer.
Video
Notes
Expert Tips
Room Temperature Eggs: Always use eggs at room temperature for both the pastry cream and the cake. This helps the cream to cook more efficiently and results in a lighter, more easily rising cake.
Grease Ramekins Properly: Before adding your cake batter, generously grease the ramekins with softened butter. This step is essential to ensure your cakes release smoothly from the ramekins after baking.
Use the Right Size Ramekins: The ideal ramekins for this recipe are two 10-ounce ones, measuring about 4 inches in diameter and 1 ¾ inches in height. If the ramekins are larger, your cake layers will be thinner and bake more quickly. Conversely, smaller ramekins will produce thicker layers and require longer baking times.
Alternative Baking Dish Option: A 5x5-inch baking dish is also a suitable alternative. With this size, you'll create one single layer of cake, which you can then cut in half to form two square layers.
Constant Attention to Pastry Cream: When cooking the pastry cream, continuous whisking is critical. Never leave it unattended on the stove. This constant motion ensures even thickening of the cream and prevents lump formation.
Making Your Own Self-Rising Flour
Self-rising flour is a convenient blend of all-purpose flour, baking powder, and salt. If you don't have it in your pantry, you can easily make it yourself. Here's a simple recipe that makes about one cup of self-rising flour:
Combine 1 cup of all-purpose flour with 1 ½ teaspoons of baking powder and ¼ teaspoon of salt.
For this Mini Boston Cream Pie recipe, you'll need just ½ cup of this homemade self-rising flour. Store any remaining flour in a zip-top bag or an airtight container for future use.
This homemade version is a quick and easy substitute, ensuring you can still enjoy baking your cake without needing to run to the store for a special ingredient.
Nutrition
Serving: 1serving | Calories: 446kcal | Carbohydrates: 42g | Protein: 7g | Fat: 31g | Saturated Fat: 18g | Polyunsaturated Fat: 1g | Monounsaturated Fat: 9g | Trans Fat: 1g | Cholesterol: 124mg | Sodium: 168mg | Potassium: 178mg | Fiber: 1g | Sugar: 26g | Vitamin A: 948IU | Vitamin C: 1mg | Calcium: 74mg | Iron: 1mg